
Preparing article title...
[ad_1]
Coaching giant language fashions (LLMs) fashions has turn out to be a major expense for companies. For a lot of use circumstances, firms want to use LLM basis fashions (FM) with their domain-specific information. Nevertheless, firms are discovering that performing full positive tuning for these fashions with their information isn’t price efficient. To scale back prices whereas persevering with to make use of the facility of AI, many firms have shifted to positive tuning LLMs on their domain-specific information utilizing Parameter-Environment friendly Wonderful Tuning (PEFT). PEFT is a set of strategies designed to adapt pre-trained LLMs to particular duties whereas minimizing the variety of parameters that have to be up to date. Methods reminiscent of Low-Rank Adaptation (LoRA) and Weighted-Decomposed Low Rank Adaptation (DoRA), considerably lowering the variety of trainable parameters and leading to decrease prices for positive tuning.
Along with price, performing positive tuning for LLMs at scale presents important technical challenges. The method of establishing and configuring a distributed coaching surroundings might be complicated, requiring experience in server administration, cluster configuration, networking and distributed computing. Manually managing such complexity can usually be counter-productive and take away useful assets out of your companies AI growth. To simplify infrastructure setup and speed up distributed coaching, AWS launched Amazon SageMaker HyperPod in late 2023.
On this weblog put up, we showcase how one can carry out environment friendly supervised positive tuning for a Meta Llama 3 mannequin utilizing PEFT on AWS Trainium with SageMaker HyperPod. We use HuggingFace’s Optimum-Neuron software program growth package (SDK) to use LoRA to fine-tuning jobs, and use SageMaker HyperPod as the first compute cluster to carry out distributed coaching on Trainium. Utilizing LoRA supervised fine-tuning for Meta Llama 3 fashions, you may additional cut back your price to positive tune fashions by as much as 50% and cut back the coaching time by 70%.
Resolution overview
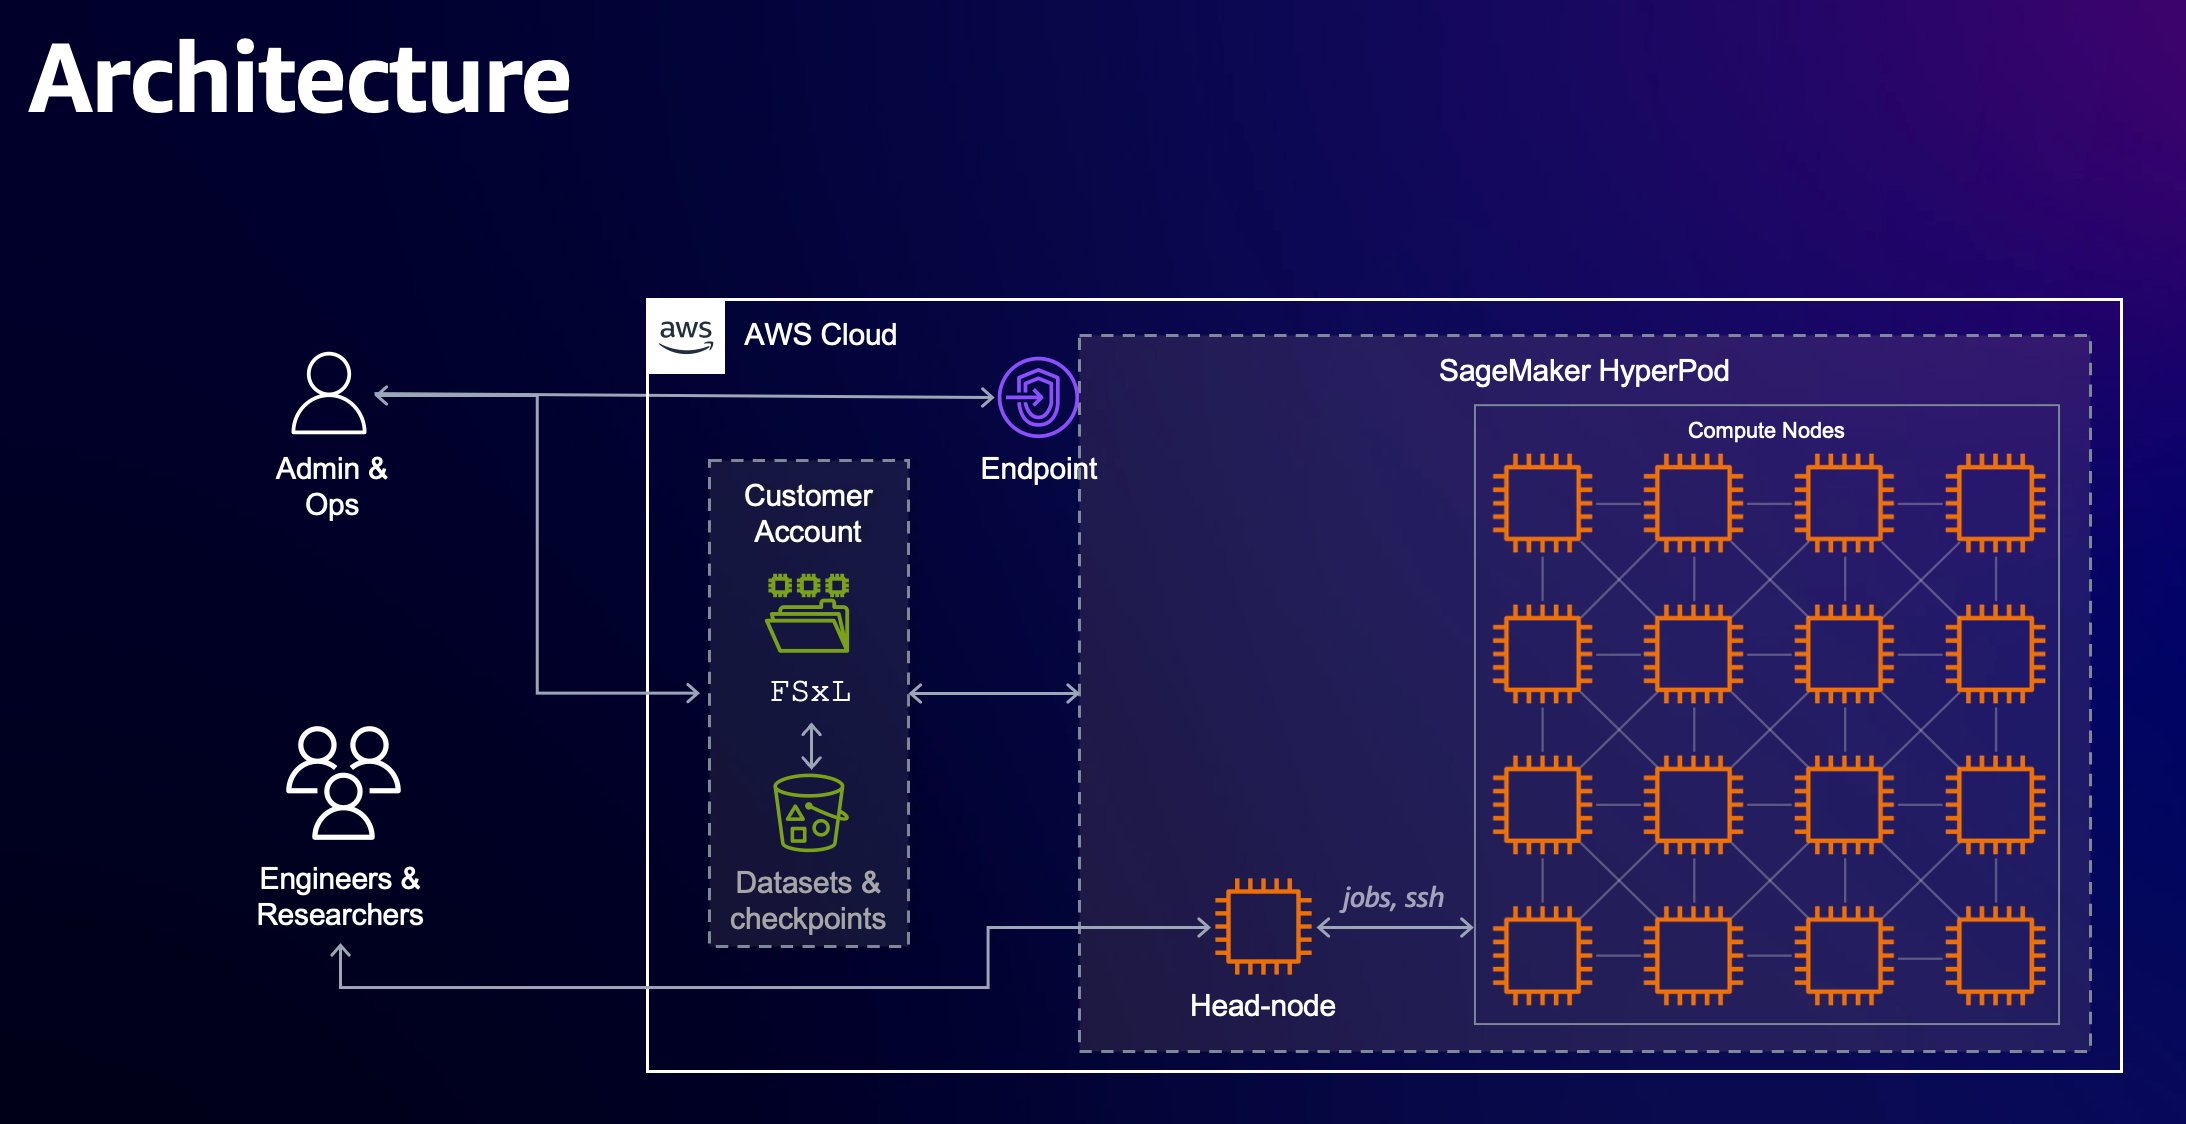
SageMaker HyperPod is designed to assist cut back the time required to coach generative AI FMs by offering a purpose-built infrastructure for distributed coaching at scale. When utilizing SageMaker HyperPod for coaching, SageMaker will actively monitor the cluster’s well being, mechanically changing defective nodes and resuming mannequin coaching from checkpoints. The clusters come pre-configured with SageMaker distributed coaching libraries that allow you to separate your coaching information and mannequin throughout 1000’s of compute nodes, permitting information to be processed in parallel whereas absolutely using the cluster’s compute and community infrastructure. You may also customise your distributed coaching. The structure diagram that follows supplies a excessive degree overview of those varied parts:
- Compute cluster: This incorporates a head node that orchestrates computation throughout a cluster of employee nodes. As a result of the pinnacle node is simply facilitating the coaching, it’s usually a a lot smaller occasion. On this put up, we use Amazon Elastic Compute Cloud (Amazon EC2) Trn1 instances for the employee nodes and a single Amazon EC2 C5 instance for the pinnacle node.
- Shared Quantity: FSx for Lustre is used because the shared storage quantity throughout nodes to maximise information throughput. It’s mounted at
/fsxon the pinnacle and compute nodes. - Exterior storage: Amazon Simple Storage Service (Amazon S3) is used to retailer the cluster’s lifecycle scripts, configuration recordsdata, datasets, and checkpoints.
- Scheduler: SLURM is used because the job scheduler for the cluster.
Trainium chips are purpose-built for deep studying coaching of 100 billion and bigger parameter fashions. Mannequin coaching on Trainium is supported by the AWS Neuron SDK, which supplies compiler, runtime, and profiling instruments that unlock high-performance and cost-effective deep studying acceleration. To be taught extra about Trainium chips and the Neuron SDK, see Welcome to AWS Neuron.
To combine Trainium chips with present fashions and instruments offered via the transformers bundle, Hugging Face’s Optimum-Neuron bundle capabilities as an interface with Neuron. With Optimum-Neuron, customers can apply strategies reminiscent of LoRA to their fine-tuning jobs, streamlining the method of adapting LLMs for particular duties whereas capitalizing on the efficiency positive factors offered by the AWS infrastructure.
Conventional positive tuning includes modifying all of the parameters of a mannequin, which might be computationally costly and reminiscence intensive. PEFT approaches reminiscent of LoRA concentrate on introducing a smaller set of trainable parameters, usually within the type of low-rank matrices that alter the mannequin’s habits whereas preserving most of its parameters frozen. The benefit of LoRA lies in its capability to keep up the efficiency of the bottom mannequin whereas considerably reducing the computational burden and useful resource necessities. The Neuron 2.20 launch helps mannequin coaching with LoRA on Trainium.
Within the subsequent part, we’ll stroll via the code in three steps for PEFT on Trainium with HyperPod:
- Establishing and deploying a HyperPod cluster for distributed coaching.
- Wonderful tuning a Meta Llama 3-8B mannequin on Trainium occasion with the dolly 15k dataset.
- Mannequin weights consolidation and inference.
Amazon SageMaker HyperPod cluster setup
On this first part, you’ll start establishing your Amazon SageMaker HyperPod compute surroundings for positive tuning.
Conditions
The next are the conditions for configuring and deploying a SageMaker HyperPod cluster for positive tuning:
Step 1: Infrastructure setup
After finishing the conditions, deploy an AWS CloudFormation stack that incorporates the mandatory infrastructure parts for distributed coaching via SageMaker HyperPod. The default Area specified within the template is us-west-2, however you may modify that. Additionally, you will must specify the Availability Zone the place your subnets will likely be deployed. The template configures your surroundings with an Amazon Virtual Private Cloud (Amazon VPC) and corresponding private and non-private subnets for community isolation. It establishes extra parts inside your VPC together with an S3 bucket for lifecycle scripts and FSx for Lustre, a file system shared throughout the pinnacle and compute nodes of the HyperPod cluster.
Step 2: Cluster configuration
Configure and deploy the HyperPod cluster. Start by defining your infrastructure’s surroundings variables via the create_config script. This script makes use of the AWS CLI to extract infrastructure part variables out of your CloudFormation stack together with Area, useful resource IDs, and Amazon Useful resource Identify (ARN).
After setting your surroundings variables, obtain the lifecycle scripts required for bootstrapping the compute nodes in your SageMaker HyperPod cluster and outline its configuration settings earlier than importing the scripts to your S3 bucket.
After importing the Lifecycle scripts to Amazon S3, create your cluster and file system configurations. See the Create Cluster part of the SageMaker HyperPod workshop to create these recordsdata. After producing the cluster-config.json and provisioning_parameters.json configuration recordsdata, validate them and add the FSx for Lustre configuration file to Amazon S3.
Step 3: Cluster deployment
Now that the cluster’s configuration is outlined, you may create the cluster.
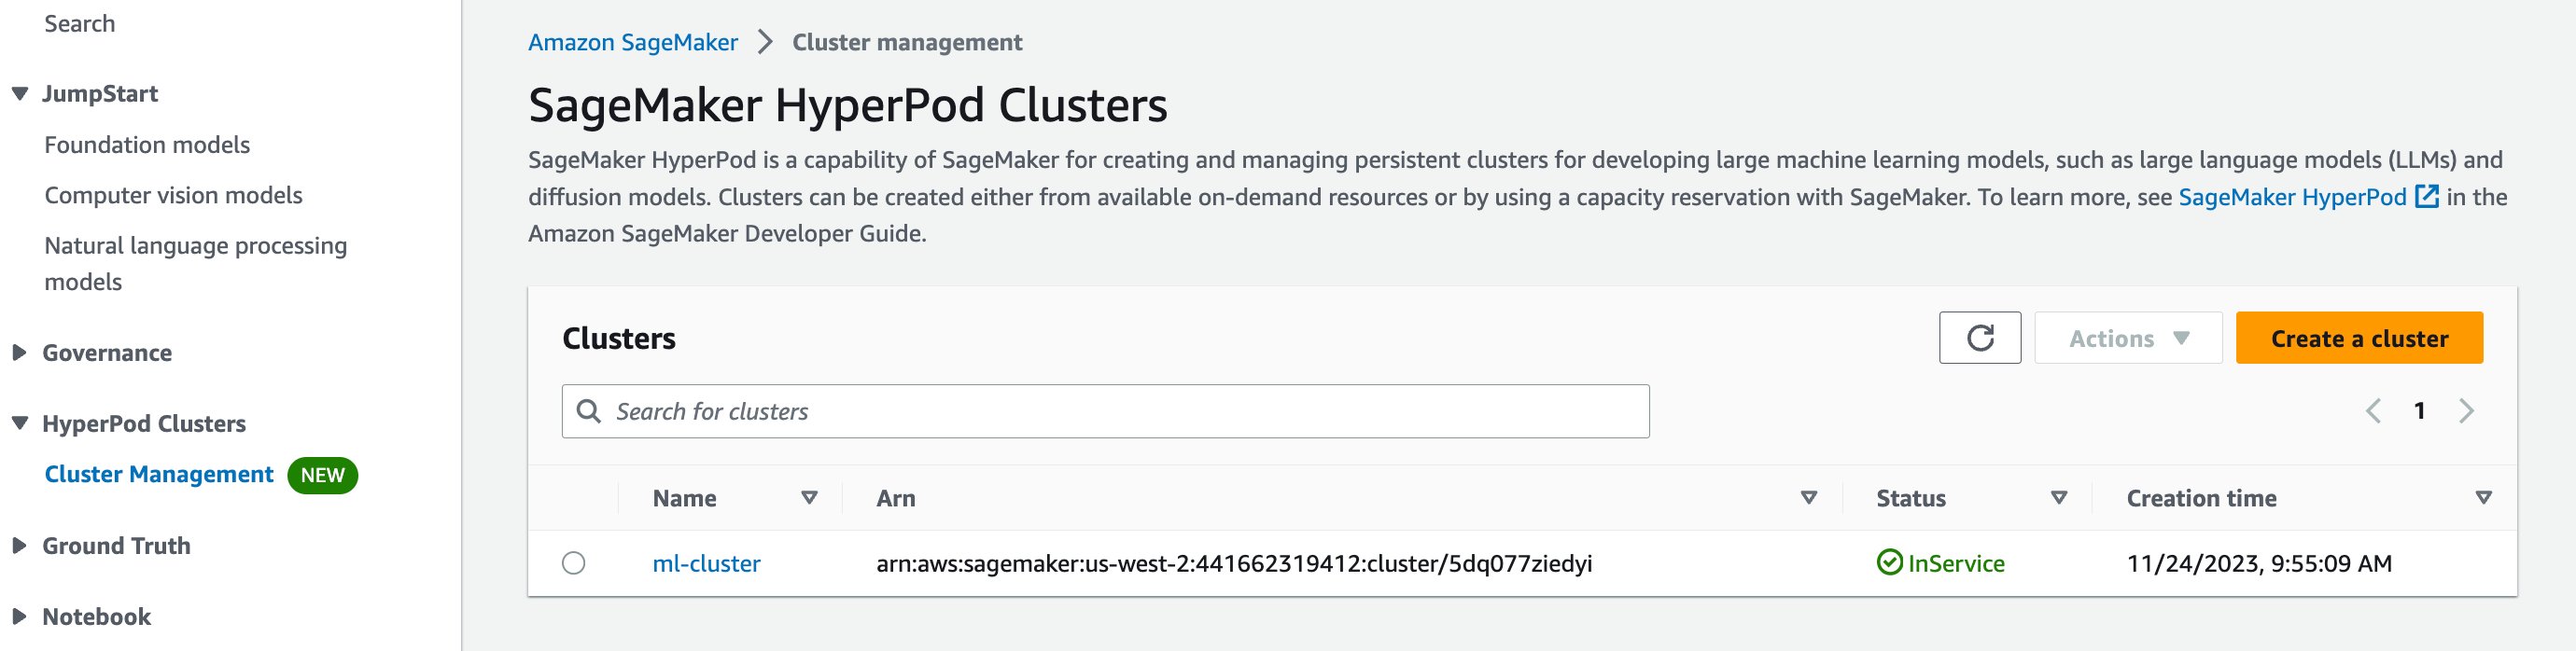
You must have the ability to see your cluster by navigating to SageMaker Hyperpod within the AWS Administration Console and see a cluster named ml-cluster listed. After a couple of minutes, its standing ought to change from Creating to InService.
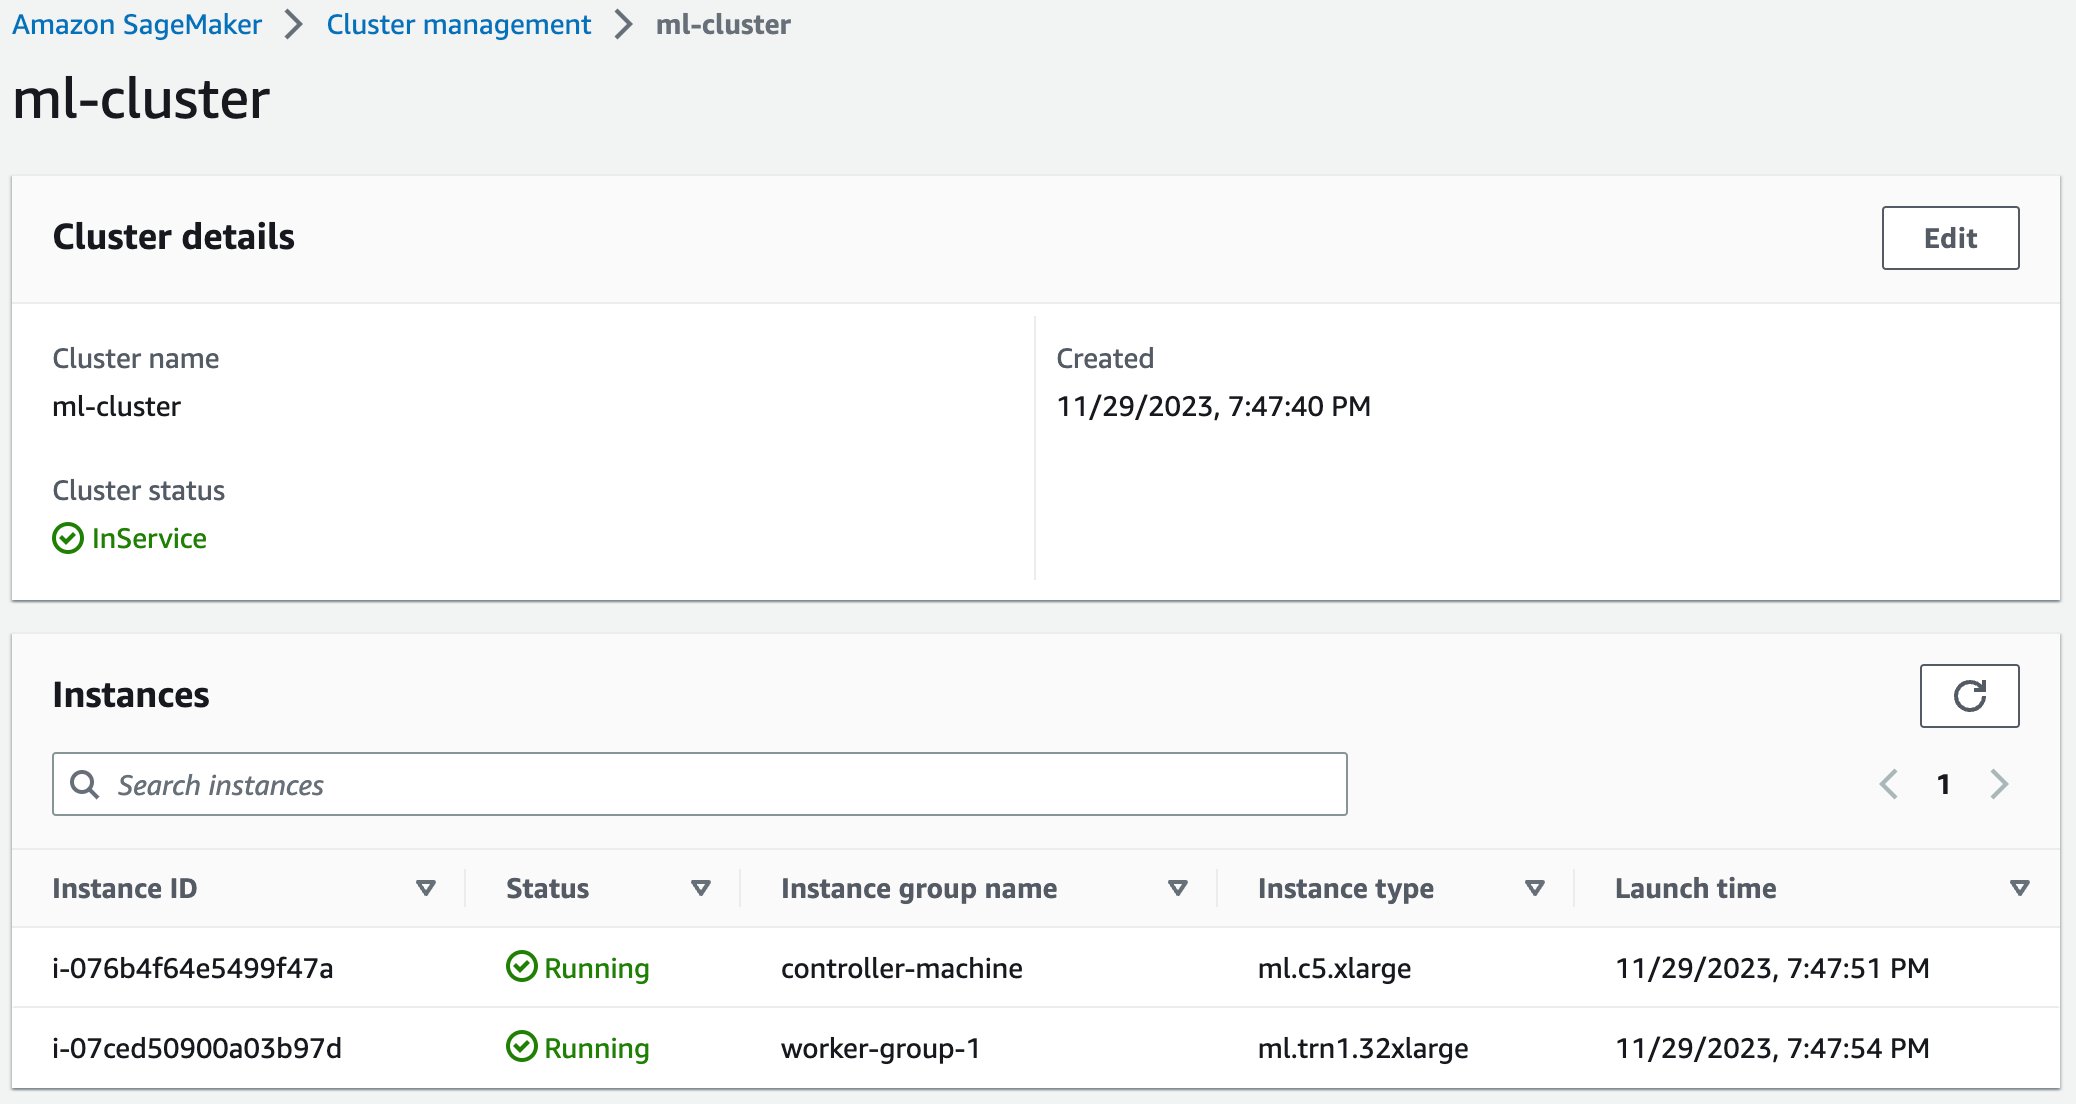
If you choose your cluster, it is possible for you to to see the small print of your compute cluster together with the pinnacle and employee nodes.
After putting in the Programs Supervisor Session Supervisor plugin, you may ssh into your cluster’s head node utilizing the easy-ssh script to start coaching.
Now that your cluster is operating and accessible via ssh, you may start importing the mannequin coaching scripts to the shared file system via both curl or the AWS CLI. For extra directions on establishing your cluster, see the SageMaker HyperPod workshop.
Wonderful tuning
Now that your SageMaker HyperPod cluster is deployed, you can begin getting ready to execute your positive tuning job.
Information preparation
The muse of profitable language mannequin positive tuning lies in correctly structured and ready coaching information. This implementation focuses on instruction-tuned datasets, which type the spine of recent language mannequin adaptation. These datasets work collectively to create significant coaching examples via three important parts:
- Directions that information the mannequin’s activity.
- Non-compulsory context that gives background data.
- Responses that symbolize the specified output.
Coaching begins by loading your dataset and formatting your dataset examples with this construction. Loading your dataset might be achieved via the Hugging Face datasets library, which supplies an easy interface for accessing and managing coaching information. Hugging Face additionally supplies this format perform for the databricks-dolly-15k dataset. Be aware that the format perform must be embedded in your prepare.py file (as proven within the following pattern). It’s referenced by the NeuronSFTTrainer to format your dataset throughout positive tuning.
The formatting perform employs delimiter tokens ("###") to create clear boundaries between totally different parts of every coaching instance. This separation is vital as a result of it helps the mannequin distinguish between totally different elements of the enter throughout coaching. The perform handles circumstances the place context could be lacking, ensuring that the ultimate format stays constant no matter whether or not all parts are current. Double newlines between sections present extra structural readability that helps the mannequin acknowledge the pure breaks within the enter.
Tokenization
After formatting your dataset, the following step is tokenization—the method of changing your textual content information right into a numerical format that your mannequin can perceive. Tokenization serves because the bridge between your human-readable textual content and the mathematical operations that drive your mannequin’s understanding of language. To start, you utilize Hugging Face’s AutoTokenizer to load your mannequin’s tokenizer.
The AutoTokenizer class mechanically selects the suitable tokenizer to your mannequin, loading not simply the vocabulary, but in addition the foundations and particular tokens that match your coaching configuration. The task of the padding token to match the end-of-sequence token is especially vital for causal language modeling, as a result of it verifies the constant dealing with of your variable-length sequences.
The tokenization course of itself operates in a number of phases. First, it breaks down your enter textual content into tokens primarily based on its vocabulary. These tokens are then transformed to numerical IDs that your mannequin can course of. Throughout this course of, your tokenizer additionally handles particular tokens that mark the start and finish of sequences, along with padding tokens that make it possible for the sequences in your batch have the identical size.
When working with tokenizers, your sequence size administration turns into a essential consideration. Your most sequence size should stability between preserving sufficient data to your mannequin to grasp the context and staying inside your mannequin’s architectural limitations. Too quick, and also you danger dropping vital context; too lengthy, and also you may exceed reminiscence constraints or introduce pointless computational overhead.
Mannequin compilation and positive tuning
For this answer, you created a SageMaker HyperPod cluster with the controller node and one employee node. The employee node incorporates one ml.trn1.32xlarge occasion which has 32 Neuron cores. You possibly can conduct distributed positive tuning utilizing all 32 Neuron cores throughout the employee node.
Step 1: Setting setup
You first want to put in the required Python packages for positive tuning. The next is the bash script for the Python surroundings setup. Be aware that the answer makes use of essentially the most just lately launched Neuron SDK. From the HOME listing, create a file contact surroundings.sh with the next code and run it with sbatch ./surroundings.sh. You may want to change the permissions of the shell scripts all through this put up earlier than operating them with the command chmod +x surroundings.sh.
Together with your surroundings created, swap to your fine-tuning listing earlier than continuing to the following step: cd $HOME/peft_ft.
Step 1: Obtain the bottom Llama 3 8B mannequin and tokenizer from Hugging Face
Obtain the bottom Meta Llama 3 8B mannequin and the corresponding tokenizer from Hugging Face. You’ll need to first request entry for the mannequin from Meta on Hugging Face after which use your Hugging Face entry token to obtain the mannequin. The next is the Python code for the get_model.py script to obtain the mannequin and tokenizer. Create this file with contact get_model.py and replica the next code to this file earlier than shifting on to the following step.
Subsequent, create the bash script contact get_model.sh with the code that follows and run it with the command sbatch ./get_model.sh. This may set off the get_model.py script to obtain the mannequin and tokenizer utilizing Slurm. Since you’re utilizing the Llama 3 8B mannequin, Hugging Face requires you to authenticate with an access token previous to obtain. Be sure you add your entry token to get_model.sh earlier than operating the script.
Step 2: Pre-compile mannequin
Coaching deep studying fashions on Trainium requires mannequin compilation. To try this, use the neuron_parallel_compile CLI utility, which is able to extract graphs from a trial run of your script, and carry out parallel pre-compilation of the computation graphs. Be aware that the scripts for mannequin pre-compilation are equivalent to these for the precise coaching, apart from max_steps. It’s because pre-compilation doesn’t require the completion of the whole coaching cycle; slightly, it necessitates roughly 10 coaching steps to extract the graphs. Earlier than compiling the mannequin, it’s essential to create the coaching script, contact prepare.py which is used for each pre-compilation and mannequin positive tuning steps. Add the next code after creating the file, together with the format perform beforehand talked about.
After creating the coaching file, use the next code to create the compile.sh script, which is able to set off finetune-llama3-8B.sh to compile the Llama 3 8B mannequin utilizing the neuron_parallel_compile command. You possibly can run this with the sbatch compile.sh command.
The next is the finetune-llama3-8B.sh script, which lists the hyper-parameters to your mannequin positive tuning. The script makes use of tensor parallelism for the coaching with diploma of 8. With 32 NeuronCores within the ml.trn1.32xlarge occasion, you get information parallel of diploma 4. Be aware that the script additionally units XLA_USE_BF16=1 to map each torch.float and torch.double tensors to bfloat16 tensors. This may each cut back reminiscence footprint and enhance efficiency. The script then units gradient_accumulation_steps to be 3 to get a bigger efficient batch dimension for gradient replace.
Step 3: Mannequin positive tuning
After the mannequin compiling is full, you may then begin the mannequin positive tuning by reusing the compile.sh script. To do that, stop the neuron_parallel_compile utility from being utilized by setting export NEURON_EXTRACT_GRAPHS_ONLY=-1 in compile.sh, after which re-run the script to begin positive tuning your mannequin. You may must delete the model_consolidation listing created throughout the earlier mannequin compilation step earlier than you begin your fine-tuning job.
Mannequin consolidation
When working with distributed machine studying workflows, you’ll usually must handle and merge mannequin weights effectively. Let’s discover two important processes that you just’ll ceaselessly encounter: checkpoint consolidation and weight merging when performing LoRA positive tuning.
Checkpoint consolidation
Throughout distributed coaching, your mannequin checkpoints are usually cut up throughout a number of gadgets in keeping with the mannequin parallelism configuration that you just present. To convey these items again collectively, you’ll use a consolidation course of. Your consolidation perform handles three major duties. First, it combines distributed checkpoints right into a unified mannequin. Then, it manages reminiscence effectively by processing tensors in chunks. Lastly, it creates sharded outputs with an index file for fast entry.
LoRA weight merging
While you’re working with LoRA, it’s essential to merge these adapters along with your base mannequin. The merging course of is easy however requires cautious consideration to element. Begin by loading your base mannequin and LoRA configuration. Then remodel the LoRA weight names to match your base mannequin’s construction. The method concludes by merging the adapters and saving the ultimate mannequin in a sharded format.
To place these instruments into observe, you should utilize the next scripts after your fine-tuning job has completed. First, create the Python file, contact consolidation.py and shell file, contact consolidation.sh utilizing the next code.
This code will consolidate the sharded checkpoint recordsdata generated throughout coaching right into a consolidated LoRA adaptersafetensor format. After saving the file, you may invoke this script to set off the mannequin checkpoint consolidation job. The enter listing that you just present factors to your fine-tuned mannequin’s sharded checkpoints and the output listing for the consolidated LoRA adapter safetensor file. You set off this with sbatch consolidation.sh.
After consolidation is full, it’s essential to merge the LoRA adapter weights from the consolidated recordsdata with the bottom mannequin’s weights. Start by creating a brand new Python file contact merge_lora.py and shell file merge_lora.sh utilizing the next code.
Set off the run with sbatch merge_lora.sh to merge the mannequin weights. Right here the base_model_path parameter is the native listing the place you beforehand downloaded the mannequin from Hugging Face in step 1 of “Mannequin compilation and positive tuning.” Equally, the adapter_config_path parameter would be the mannequin’s configuration file beforehand downloaded and the lora_safetensors_path parameter would be the path to the mannequin.safetensor file output by the LoRA consolidation within the earlier step.
Inference
After consolidation and merging, the safetensors recordsdata will likely be saved to your final_model_path output listing containing the up to date mannequin weights after positive tuning. Utilizing these up to date weights, you may load and generate a prediction to your skilled mannequin within the context of the dolly dataset. To verify that the fine-tuned mannequin understands the databricks-dolly-15k dataset it was positive tuned on, choose a query from the dataset for validation, as proven within the following determine.
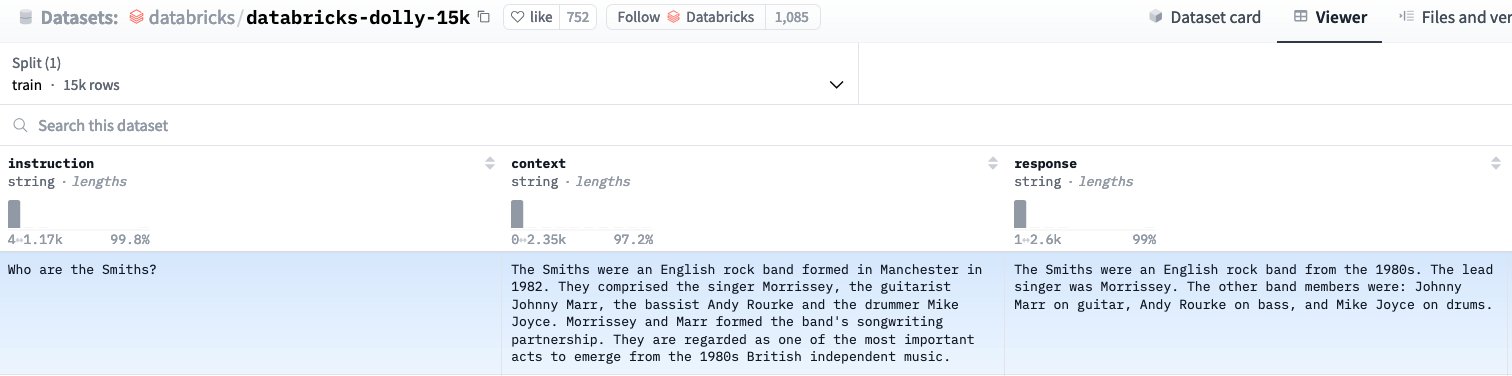
Utilizing Hugging Face’s LlamaForCausalLM class you may load your newly fine-tuned mannequin, and generate a prediction for the query, “Who’re the Smiths?” (proven within the following determine):

Evaluating the generated reply to the bottom reality context and response from the coaching dataset, it’s clear that the fine-tuned Meta Llama 3 mannequin now understands this information and may give coherent responses to posed questions.
Outcomes
| Method | Trainable parameters | Samples processed per second | Coaching time (minutes) |
| FPFT | 7,570,591,744 | 2.083 | 90 |
| PEFT | 6,815,744 | 3.554 | 53 |
To benchmark the fine-tuned mannequin’s efficiency with LoRA on a single ml.trn1.32xlarge, we in contrast it to full parameter positive tuning (FPFT) for the mannequin over three coaching epochs. Measuring coaching samples processed per second confirmed a 70% improve in throughput and discount in coaching time for the LoRA fine-tuned mannequin. Subsequently, on-demand hours required to positive tune the mannequin on the dolly 15k dataset for 3 epochs was halved in comparison with FPFT, leading to a 50% discount of coaching prices.
Clear up
To wash up the assets provisioned for this put up, first delete the SageMaker HyperPod cluster. This may be performed both via the AWS CLI or within the SageMaker console.
After the cluster is deleted, delete the CloudFormation template to delete the remaining provisioned assets.
Conclusion
On this put up, we confirmed you the best way to arrange a SageMaker HyperPod compute cluster for coaching. Then we confirmed you the best way to carry out multi-node distributed positive tuning with Trainium for a Meta Llama 3 mannequin utilizing LoRA. Lastly, we confirmed you the best way to consolidate mannequin weights throughout a distributed coaching surroundings to generate coherent predictions for the newly fine-tuned mannequin.
In regards to the Authors
 Georgios Ioannides is a Deep Studying Architect with the AWS Generative AI Innovation Heart. Earlier than AWS, Georgios labored in startups, the place he specialised in sign processing, deep studying, and multi-modal and cross-modal machine studying programs for speech, imaginative and prescient, and textual content functions. He holds Grasp’s levels from Imperial School London and Carnegie Mellon College.
 Bingchen Liu is a Machine Studying Engineer with the AWS Generative AI Innovation Heart. Earlier than AWS, he labored as a lead MLE in ADP specializing in RAG functions, vector database, mannequin growth, and serving. He holds a Grasp’s diploma in Laptop Science from Columbia College and a PhD in Statistics from Southern Methodist College.
 Hannah Marlowe is a Senior Supervisor of Mannequin Customization on the AWS Generative AI Innovation Heart. Her group focuses on serving to prospects develop differentiating generative AI options utilizing their distinctive and proprietary information to attain key enterprise outcomes. She holds a PhD in Physics from the College of Iowa, with a concentrate on astronomical X-ray evaluation and instrumentation growth. Outdoors of labor, she might be discovered mountain climbing, mountain biking, and snowboarding across the mountains in Colorado.
 Jeremy Roghair is a Machine Studying Engineer with the AWS Generative AI Innovation Heart, the place he focuses on creating generative AI options for distributed coaching workloads and mannequin internet hosting for purchasers. Previous to becoming a member of AWS, Jeremy labored as a Information Scientist within the finance/insurance coverage trade and earned a Grasp’s diploma in Laptop Science with analysis in reinforcement studying from Iowa State College.
[ad_2]
Source link