
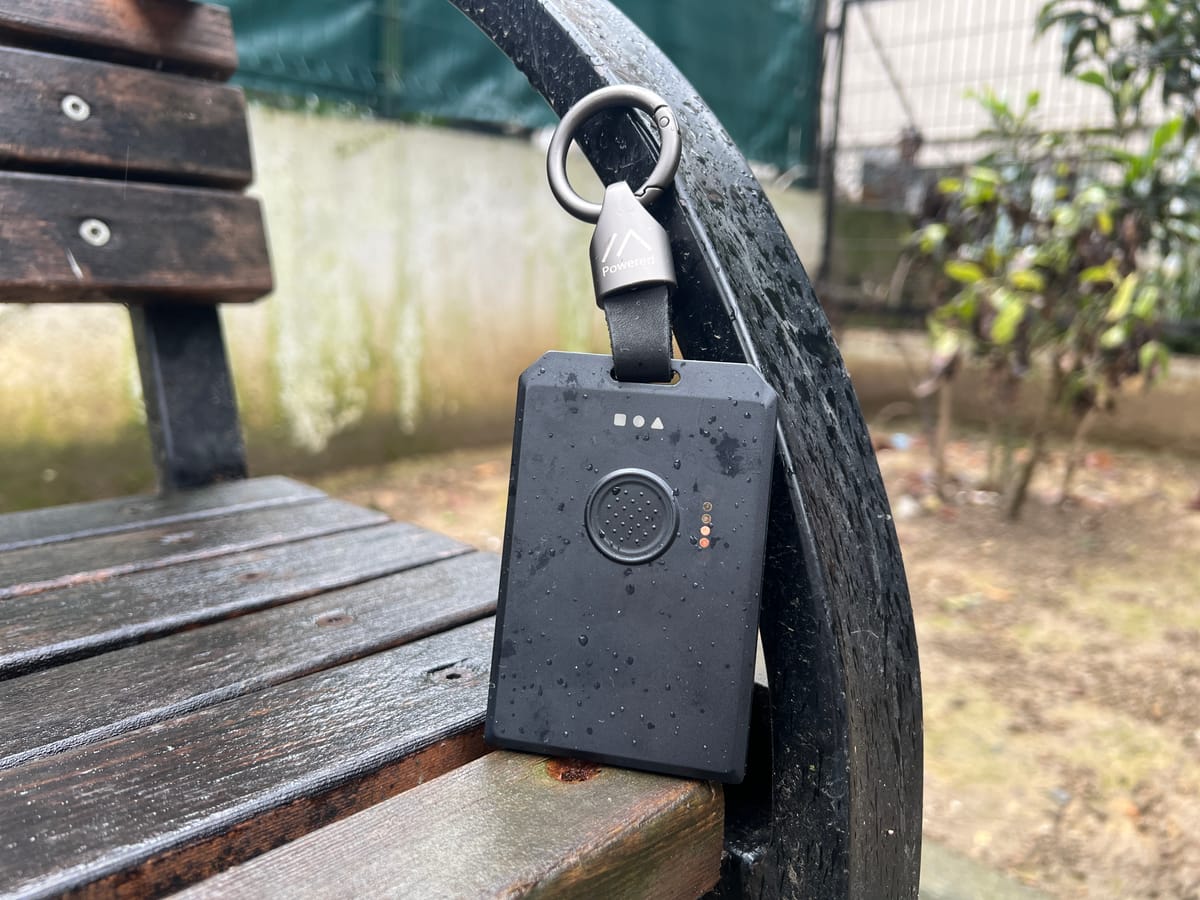
When you’ve been round Meshtastic for some time, you already know the T1000-E story. Seeed Studio discovered the candy spot, the correct {hardware} at a value no one else may match, and it grew to become the go-to EDC Meshtastic tracker for the entire neighborhood. Then RAK got here in with the WisMesh Tag, matched it characteristic for characteristic, doubled the battery life, and gained on the identical value. We lined that in full.
RAK WisMesh Tag Review: The Best Meshtastic EDC You Can Buy Right Now
The SenseCAP T1000-E has been the go-to EDC Meshtastic device, until now. RAK’s WisMesh Tag matches it on range, doubles the battery life, and builds it better. Same price. Full real-world test inside.
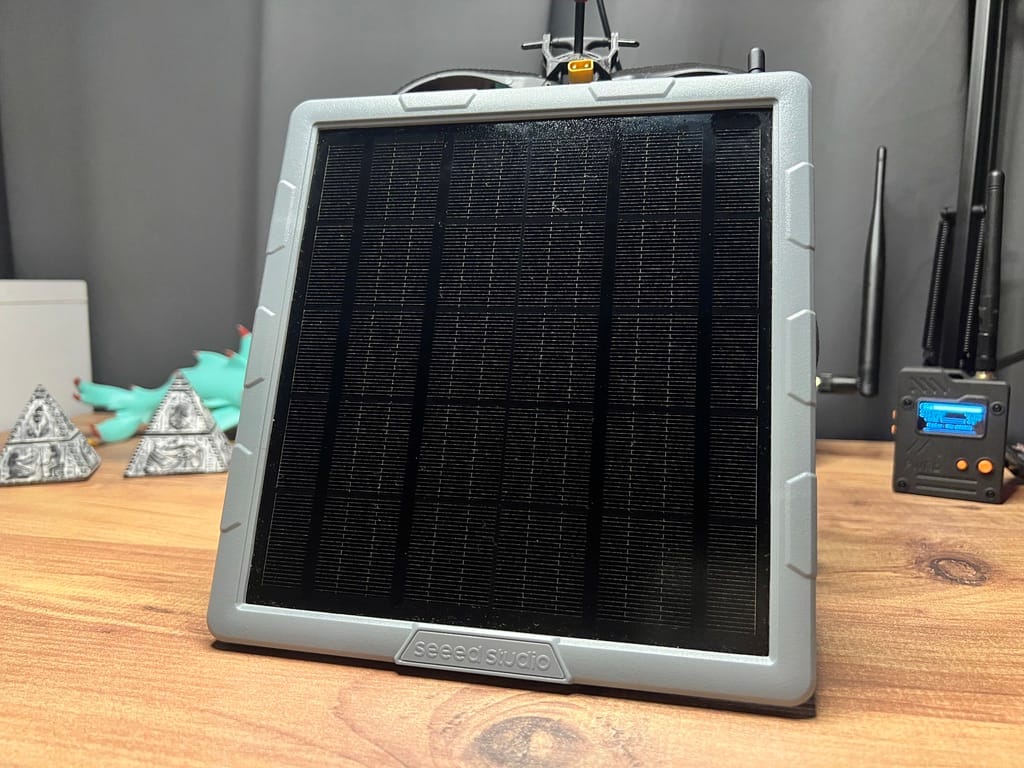
Now Seeed Studio is doing the very same factor, simply in a totally completely different class. The SenseCAP Photo voltaic Node P1-Professional is one in all possibly 3–4 ready-to-deploy photo voltaic Meshtastic nodes in the marketplace proper now that comes with batteries and GPS included. It is $89.90. And it’s extremely arduous to argue with.
We have been working it for weeks, tracked its battery habits over time utilizing Grafana through Harbor Scale, cracked it open, and went by way of each element we may. Let’s get into it.
What Even Is a Photo voltaic Node and Why Does GPS Matter Right here?
Earlier than the {hardware}, that is price explaining, particularly for those who’re coming from EDC units just like the T1000-E or WisMesh Tag.
A photo voltaic node shouldn’t be a tracker. You do not carry it. You deploy it, on a rooftop, on a pole, on a wall, and depart it there completely. Its job is to obtain packets from different nodes and relay them additional, increasing the attain of your complete Meshtastic mesh community.
So why does it have GPS? The reply surprises most individuals. It is not for location monitoring. A hard and fast, mounted node would not have to report “I moved.” What GPS provides a completely deployed node is exact time synchronization. Meshtastic makes use of GPS time to coordinate slot timing throughout the mesh, which improves packet supply, reduces collisions, and makes the entire community extra environment friendly. If you wish to go deep on why this issues, we broke all of it down right here
Why Your Meshtastic Node Sees More Satellites (GNSS Explained)
Why does your node see 12 satellites while your friend’s sees 6? It isn’t luck, it’s GNSS. We break down hardware differences (UBlox vs. MediaTek), atomic timing, and why relying on just “GPS” is a mistake. Learn how multi-constellation support means faster locks and a stronger mesh.
With that out of the way in which, let’s speak {hardware}.
P1 vs P1-Professional, Which One Ought to You Purchase?
There are two variations of this gadget and the distinction issues earlier than you even hit the purchase button.
SenseCAP Photo voltaic Node P1 — $69.90 Similar photo voltaic panel, identical enclosure, identical MCU and LoRa module, identical mounting package. What it would not include: batteries and GPS. You provide your personal 4 button-top 18650 cells, and in order for you GPS/time sync you add the XIAO L76K module your self. It is the funds entry level for individuals who have already got batteries mendacity round, do not want GPS timing, or simply wish to preserve prices down.
When you go the P1 route, set up is easy, take away the screws and canopy, drop in your 4 button-top 18650 (3.6V) cells into the holder, slot the GPS module onto the board for those who’re including one, then reassemble and ensure the screws are firmly tightened to take care of the enclosure seal. Flat-top 18650s won’t make dependable contact, button-top solely. The primary time you energy it on, join it through USB-C first to activate it; if it would not reply to the facility button, cost it earlier than attempting once more. Don’t use a fast-charging adapter.
SenseCAP Photo voltaic Node P1-Professional — $89.90 The whole lot above, plus 4 3350mAh 18650 batteries already put in, and the XIAO L76K GPS module pre-fitted. You open the field, mount it, and also you’re reside. The $20 premium over the P1 is genuinely good worth when you think about you are getting 4 high quality cells and a GPS module included, each already sourced, already put in, already examined on the manufacturing unit.
Our evaluate unit is the P1-Professional. When you simply desire a node up and working with out sourcing elements, that is the one.
Unboxing and First Impressions
The whole lot you want to truly deploy that is within the field. Not simply the node, the complete mounting package, the cable, the antenna, the whole lot.
- SenseCAP Photo voltaic Node P1-Professional unit
- Full mounting package: Common Joint, Connector, Hoop Bracket, Hoop Ring
- 2dBi 868–915MHz rubber rod antenna
- RF Cable: RP-SMA Male to SMA Feminine, 300mm, thick, sturdy, not the flimsy kind
- Black USB-C cable
- Consumer handbook
The unit is the largest factor we have reviewed on this website at 191.2 × 201.2 × 42.1mm. That is as a result of it is a photo voltaic panel first and a node second. Decide it up and it feels stable, not heavy-duty industrial just like the $300 RAK WisMesh Repeater, however genuinely inflexible plastic that does not flex or really feel low-cost. For the value, the construct high quality is spectacular.
The photo voltaic panel covers your entire face. Electronics are in a sealed compartment on the again. LEDs and buttons on the underside, USB-C port for backup charging or flashing, SMA connector for the antenna. The whole lot self-contained, no exterior cables, no dangling wires, nothing to handle. If you’re mounting this 3 meters up on a pole within the rain, that issues greater than it sounds.
The 2 mounting bolts on the again of the unit will make you elevate an eyebrow the primary time you take a look at them, two bolts holding a tool to a pole in wind? However after seeing how the bracket system distributes load, it is sensible. Extra on that beneath.
What’s Truly Inside
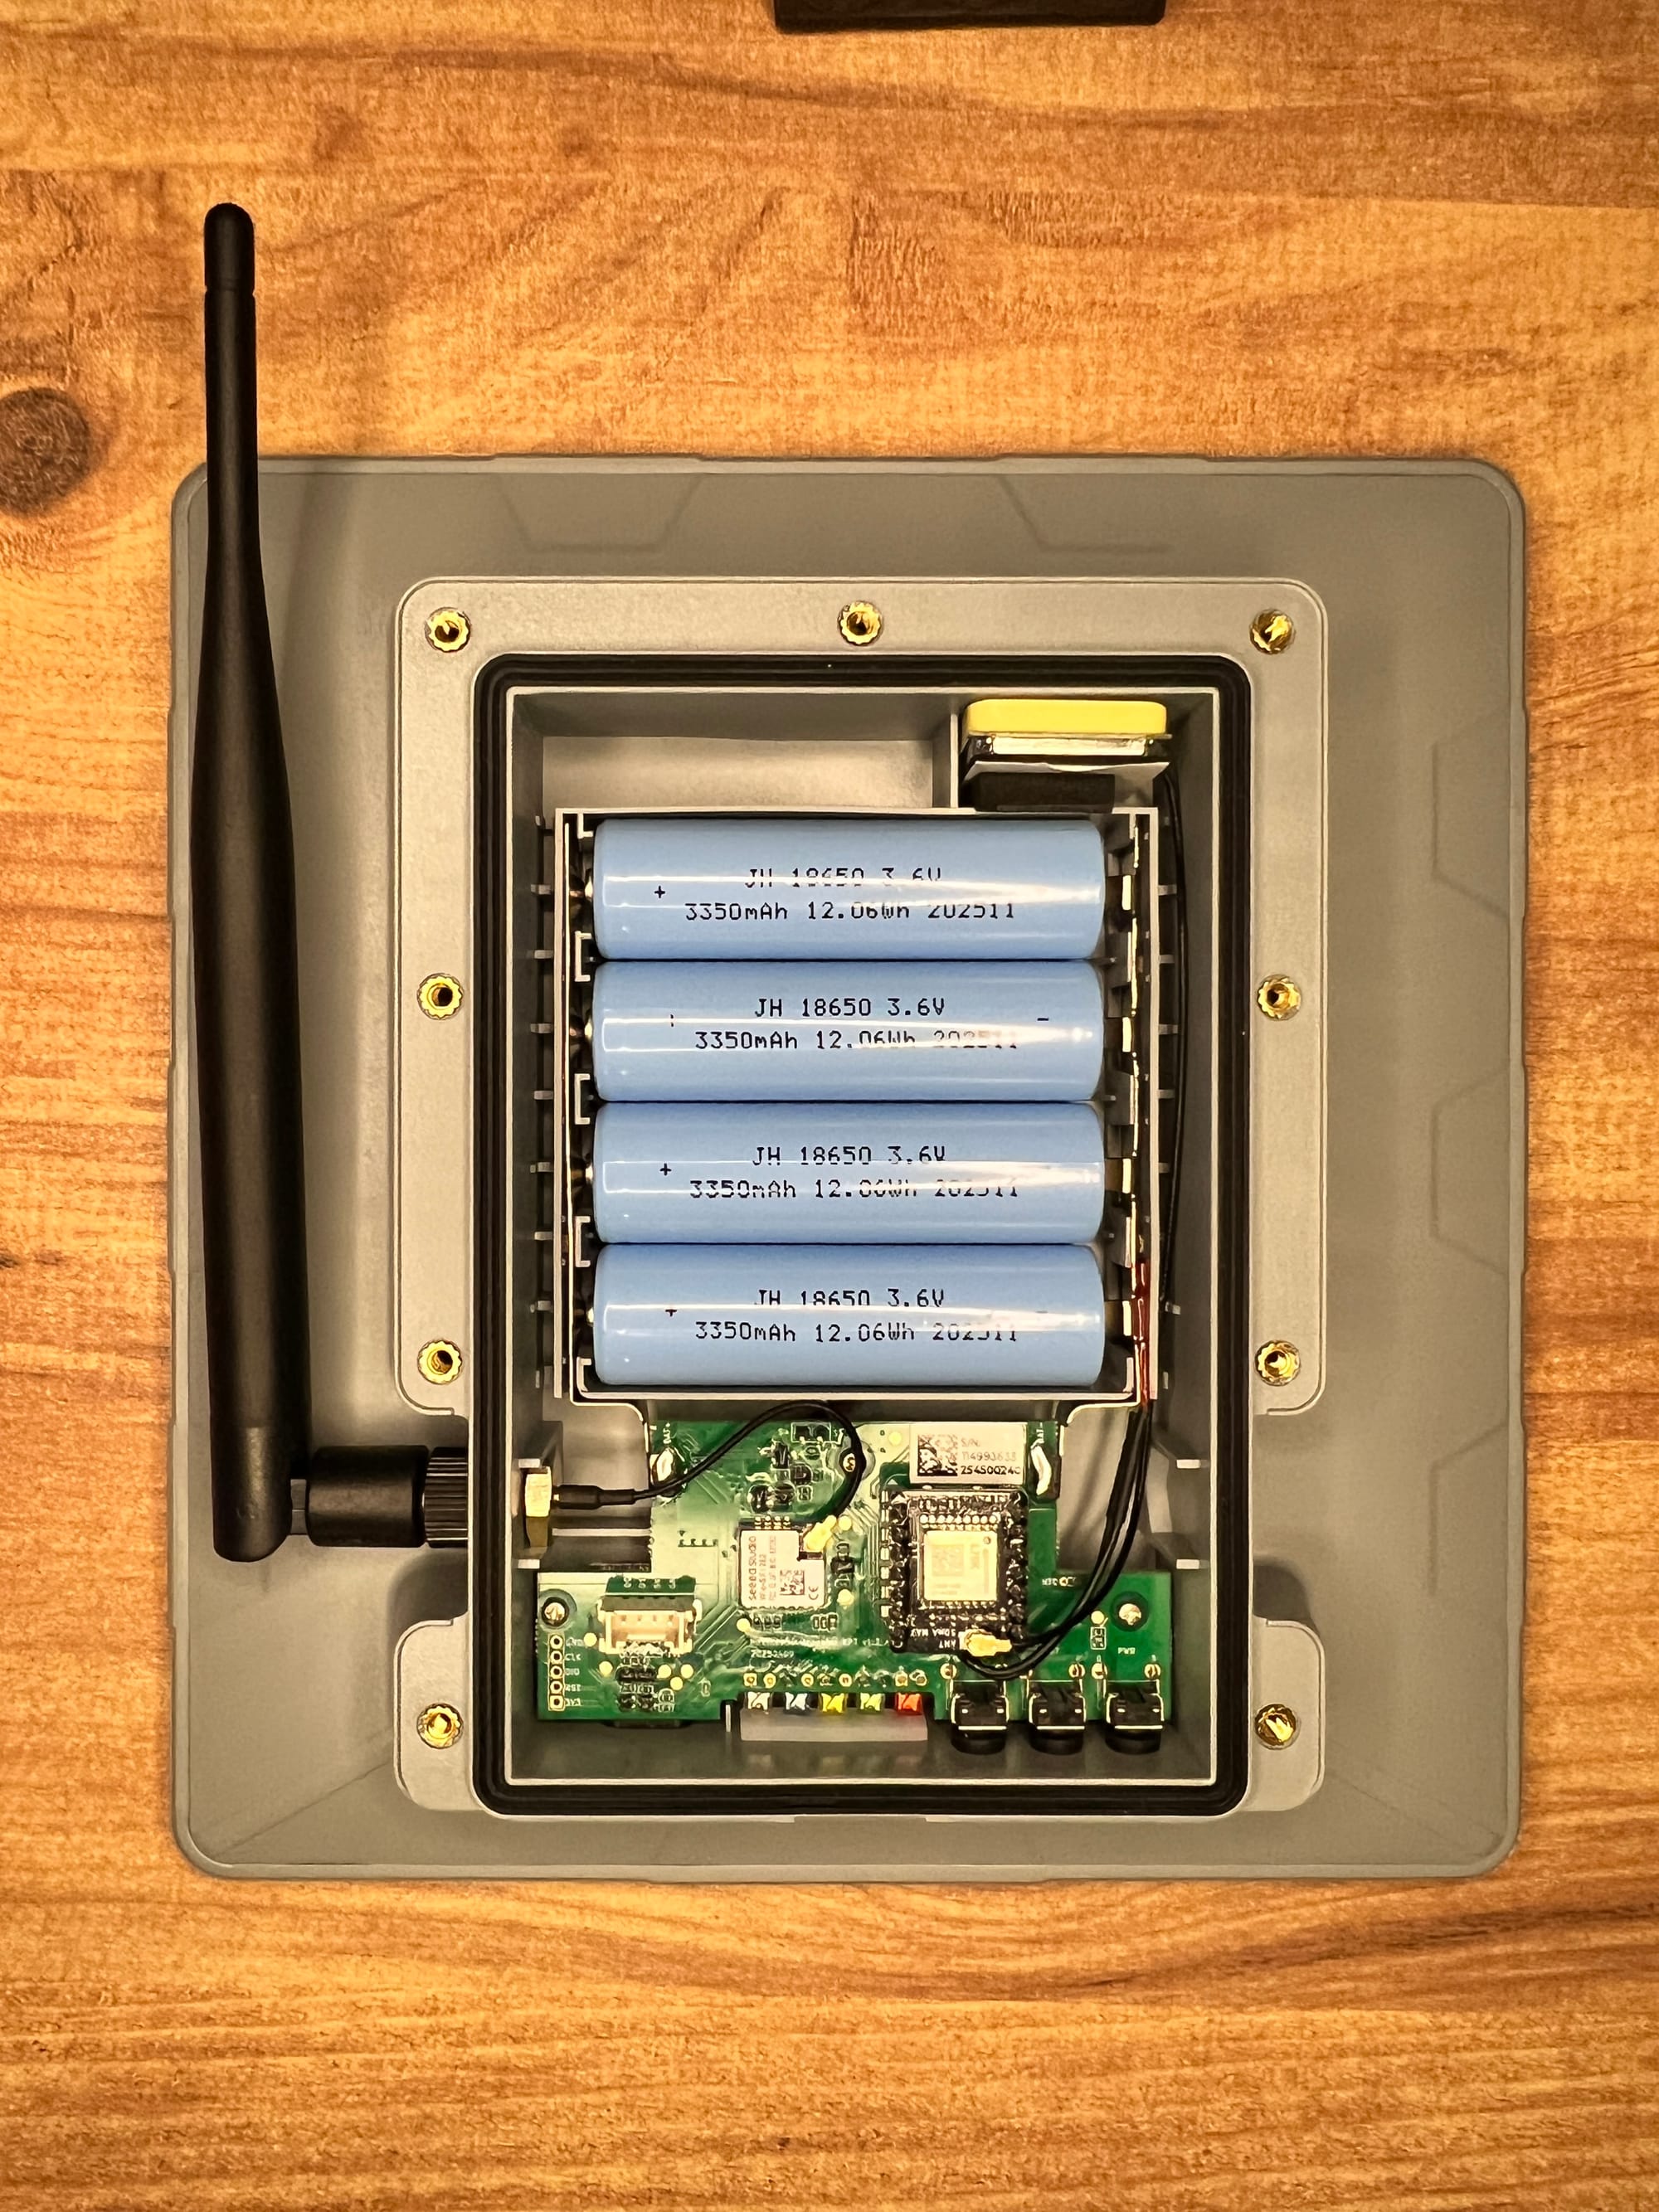
Pop the again panel and also you get a clear, well-organized PCB. Here is what’s on it:
MCU: XIAO nRF52840 Plus Nordic nRF52840, 32-bit ARM Cortex-M4 at 64MHz, 256KB RAM, 1MB Flash + 2MB onboard Flash. One of the vital power-efficient MCUs within the Meshtastic ecosystem — the identical chip household because the WisMesh Tag we reviewed. For a photo voltaic gadget that should survive cloudy stretches on battery alone, low energy consumption shouldn’t be elective.
LoRa: Wio-SX1262 Semtech SX1262, 22dBm TX energy, 862–930MHz. FCC ID seen proper on the module: 2AT4T-WIO-SX1262. Among the best LoRa chips out there, nice sensitivity, stable efficiency.
GPS: Quectel L76K Seen on the PCB with “ANT 50m MAX” labeled subsequent to its u.FL connector for the interior GPS antenna. Helps GPS, GLONASS, and Galileo. Single-band L1. For time sync on a hard and fast node, that is utterly sufficient.
Batteries: 4× JH 18650, 3350mAh every Manufactured November 2025, these are recent cells. Complete uncooked capability: 13,400mAh / ~49.6Wh throughout 4 cells. That may be a critical battery reserve by any Meshtastic normal. Alternative is easy, use button-top 18650s.
Grove connector One Grove interface (IIC/GPIO/UART) on the board for sensor growth. Extra on what this allows in its personal part.
Photo voltaic enter: 5W panel, 5V 1A Most charging present is 1A, managed by the CN3165 charging IC on board.
The inner meeting is clear and tight. Cable administration is correctly accomplished. This was designed by individuals who thought of meeting, not simply specs.
{Hardware} Specs at a Look
| SenseCAP Photo voltaic Node P1-Professional | |
|---|---|
| Value | $89.90 |
| MCU | XIAO nRF52840 Plus (nRF52840) |
| LoRa | Semtech SX1262, 22dBm, 862–930MHz |
| GPS | Quectel L76K (GPS / GLONASS / Galileo) |
| Battery | 4× 18650, 3350mAh every (~13,400mAh whole) |
| Photo voltaic Panel | 5W, 5V 1A |
| Antenna (inventory) | 2dBi rubber rod, 868–915MHz |
| Charging | Photo voltaic + USB-C 5V 1A |
| Grove interface | 1× (IIC/GPIO/UART) |
| Dimensions | 191.2 × 201.2 × 42.1mm |
| Certification | FCC, CE |
LEDs and Buttons
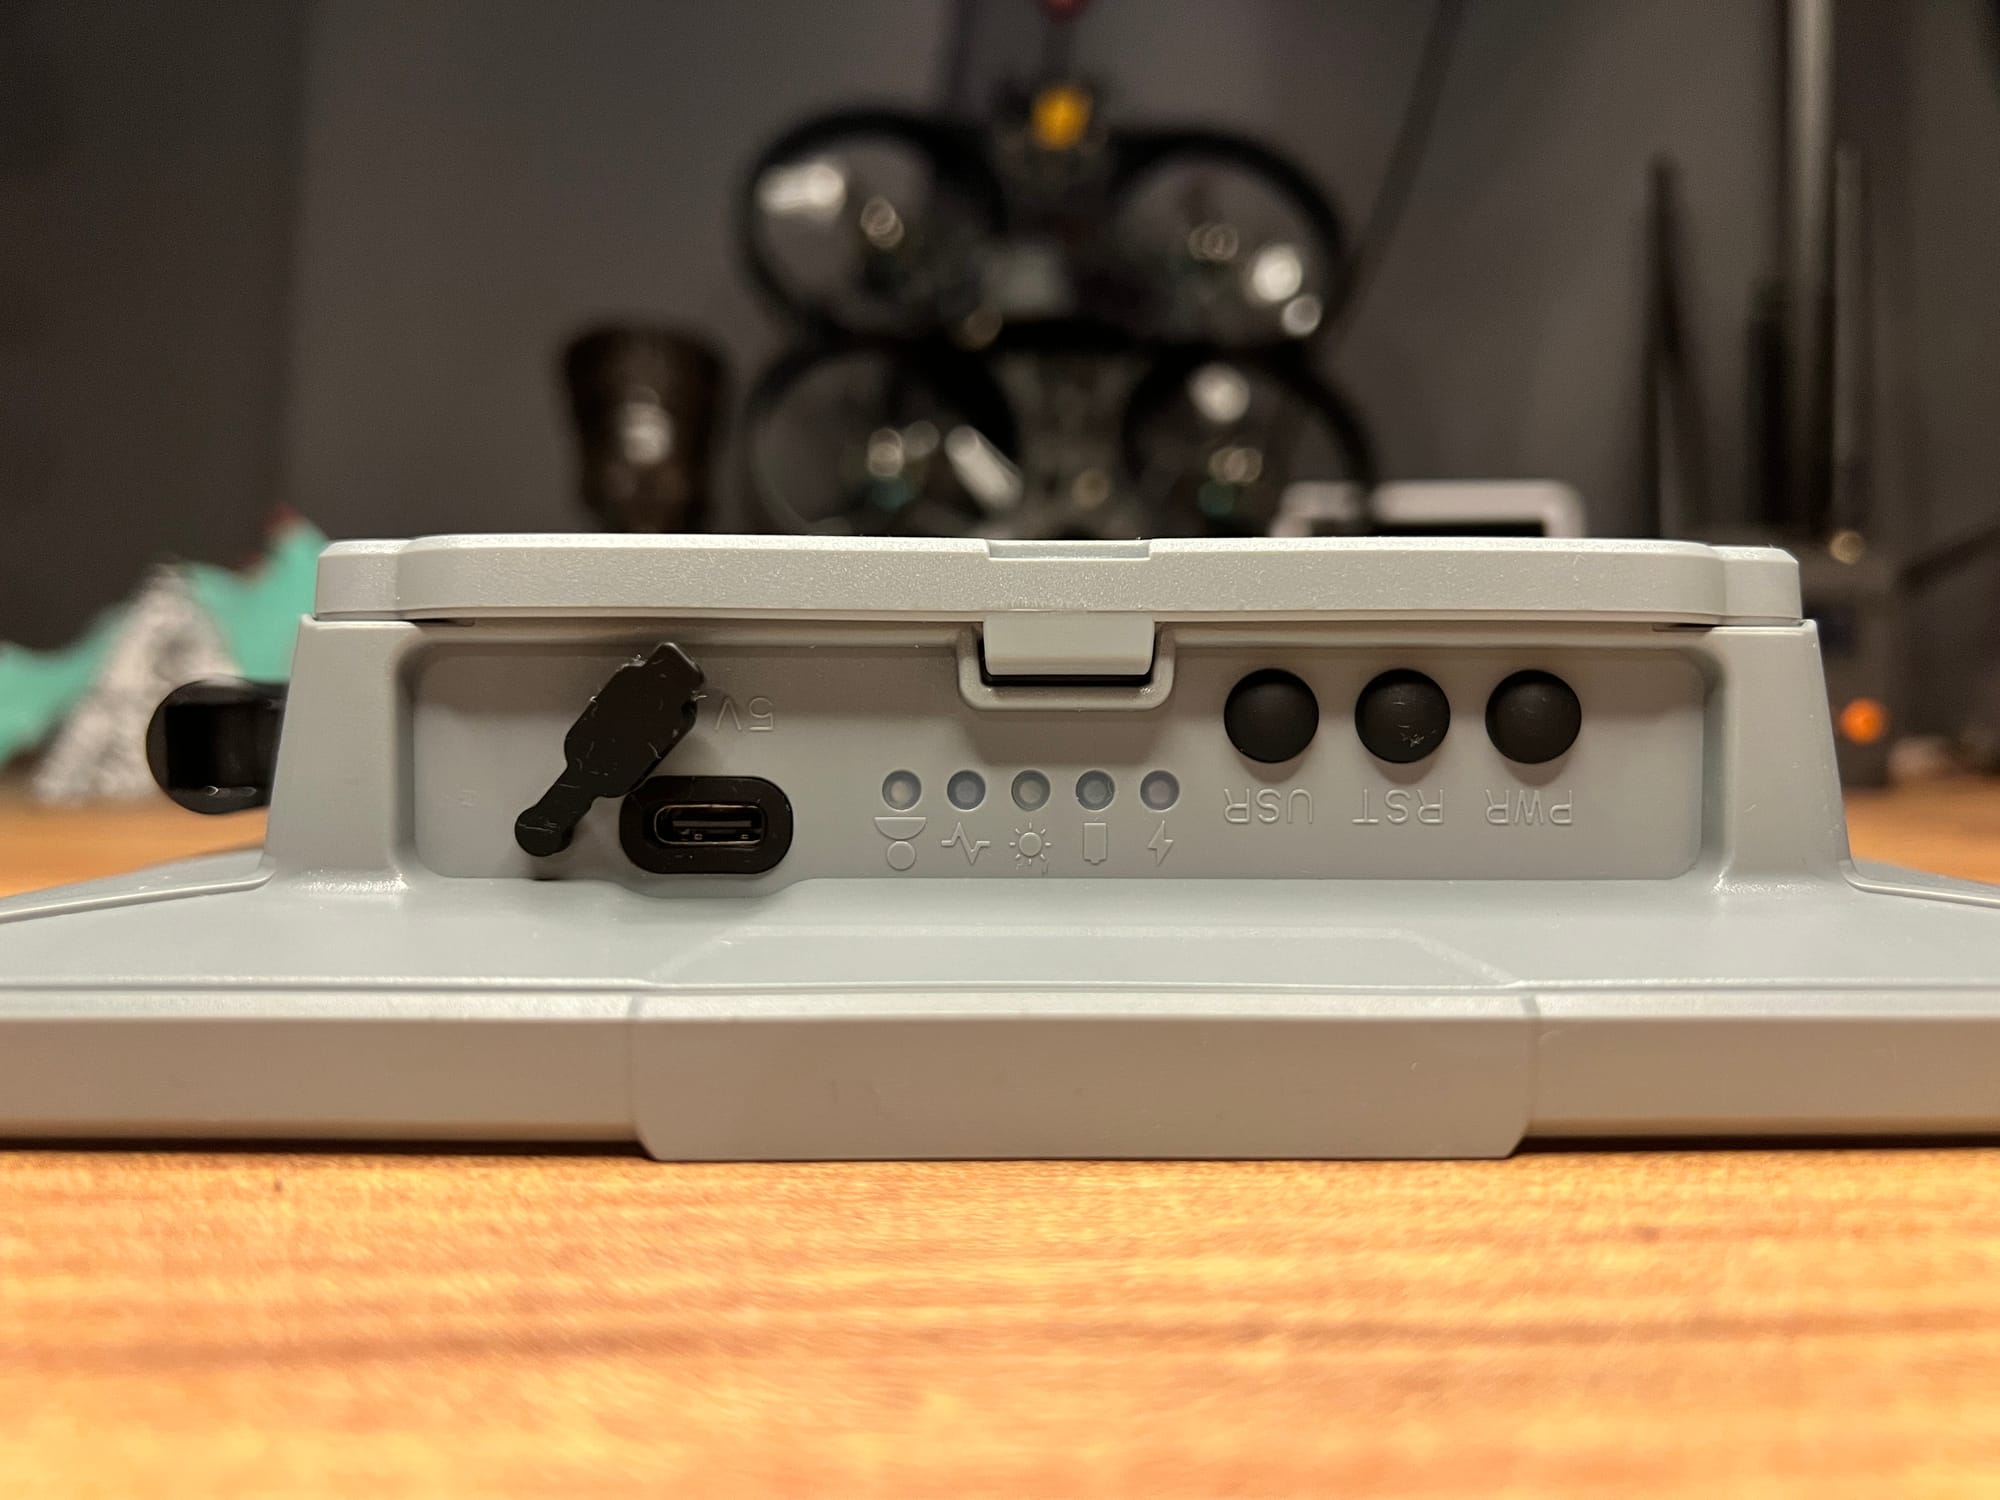
5 devoted LEDs, every with precisely one job:
- 🔴 Pink: Charging (USB-C or photo voltaic energetic)
- 🟢 Inexperienced: Totally charged
- 🟡 Yellow: Photo voltaic panel is receiving gentle
- 🔵 Blue: Mesh heartbeat
- ⚪ White: Consumer-defined
No blink-pattern decoding. No guessing whether or not you are a heartbeat or a charging state. Every gentle means one factor. The yellow photo voltaic indicator is particularly sensible, at a look, with out pulling your cellphone out, you already know whether or not the panel is seeing helpful gentle. That is a small design resolution that pays off each single day the node is deployed.
The button controls are clear and logical:
| Button Motion | Operate |
|---|---|
| Press PWR for 3s | Energy on |
| Press PWR twice | Replace node / location information |
| Press PWR thrice | Swap GPS on/off |
| Press PWR for 5s | Energy off |
| Press RST twice | Manually enter DFU mode |
The white LED (⚪ user-defined, P0.15 / GPIO 15) and the consumer button (P1.07 / GPIO 39) are each accessible by way of Meshtastic’s gadget configuration if you wish to repurpose them. To configure the consumer button, go into the Meshtastic app → Settings → Machine Configuration → Machine → GPIO → Button GPIO, and enter 39. The LED can equally be referenced by its GPIO quantity in customized configurations. It is a area of interest use case, most individuals won’t ever contact it, however for those who’re constructing out a customized position or experimenting with canned messages triggered by a {hardware} button, the pins are there and Meshtastic helps it.
No app wanted for the fundamentals. GPS toggle on the fly, place broadcast on demand, DFU from the button, all with out touching your cellphone. The RST double-press for DFU is a significantly better expertise than most units that require a selected cable-disconnect sequence.
There is a particular warning in Seeed’s documentation price repeating: don’t use NRF-OTA to replace firmware on this gadget, it could actually brick it. Use the Net Flasher or handbook UF2 drag-and-drop solely. All the time flash the erase firmware first earlier than flashing a brand new model.
⚠️
Please do not use NRF-OTA to replace the firmware, it could trigger the gadget to be utterly lifeless. Earlier than flashing the firmware, please flash the erased firmware first!
Setup and Pairing
Ships pre-flashed with Meshtastic firmware. Energy on, open the Meshtastic app, go to Bluetooth, it exhibits up instantly. Pair, set your area, accomplished. Default PIN is 123456.
For deployment as a router/repeater, go into gadget settings and set the position to Router or Repeater. Router mode is the really useful start line for many fastened node deployments.
Forget the Meshtastic App Flaresat Does It Better
Stop fighting with ATAK plugins. Flaresat is the missing map layer for Meshtastic. Get real-time tracking, shared pins, and live routes over LoRa mesh, setup takes 2 minutes. No sideloading, no servers, just instant off-grid coordination on iOS & Android. The game has changed.
Firmware Flashing
The nRF52840 is among the friendliest chips to flash in your entire ecosystem. No drivers, no Python scripts, no esptool. It seems as a USB mass storage drive and also you copy a file.
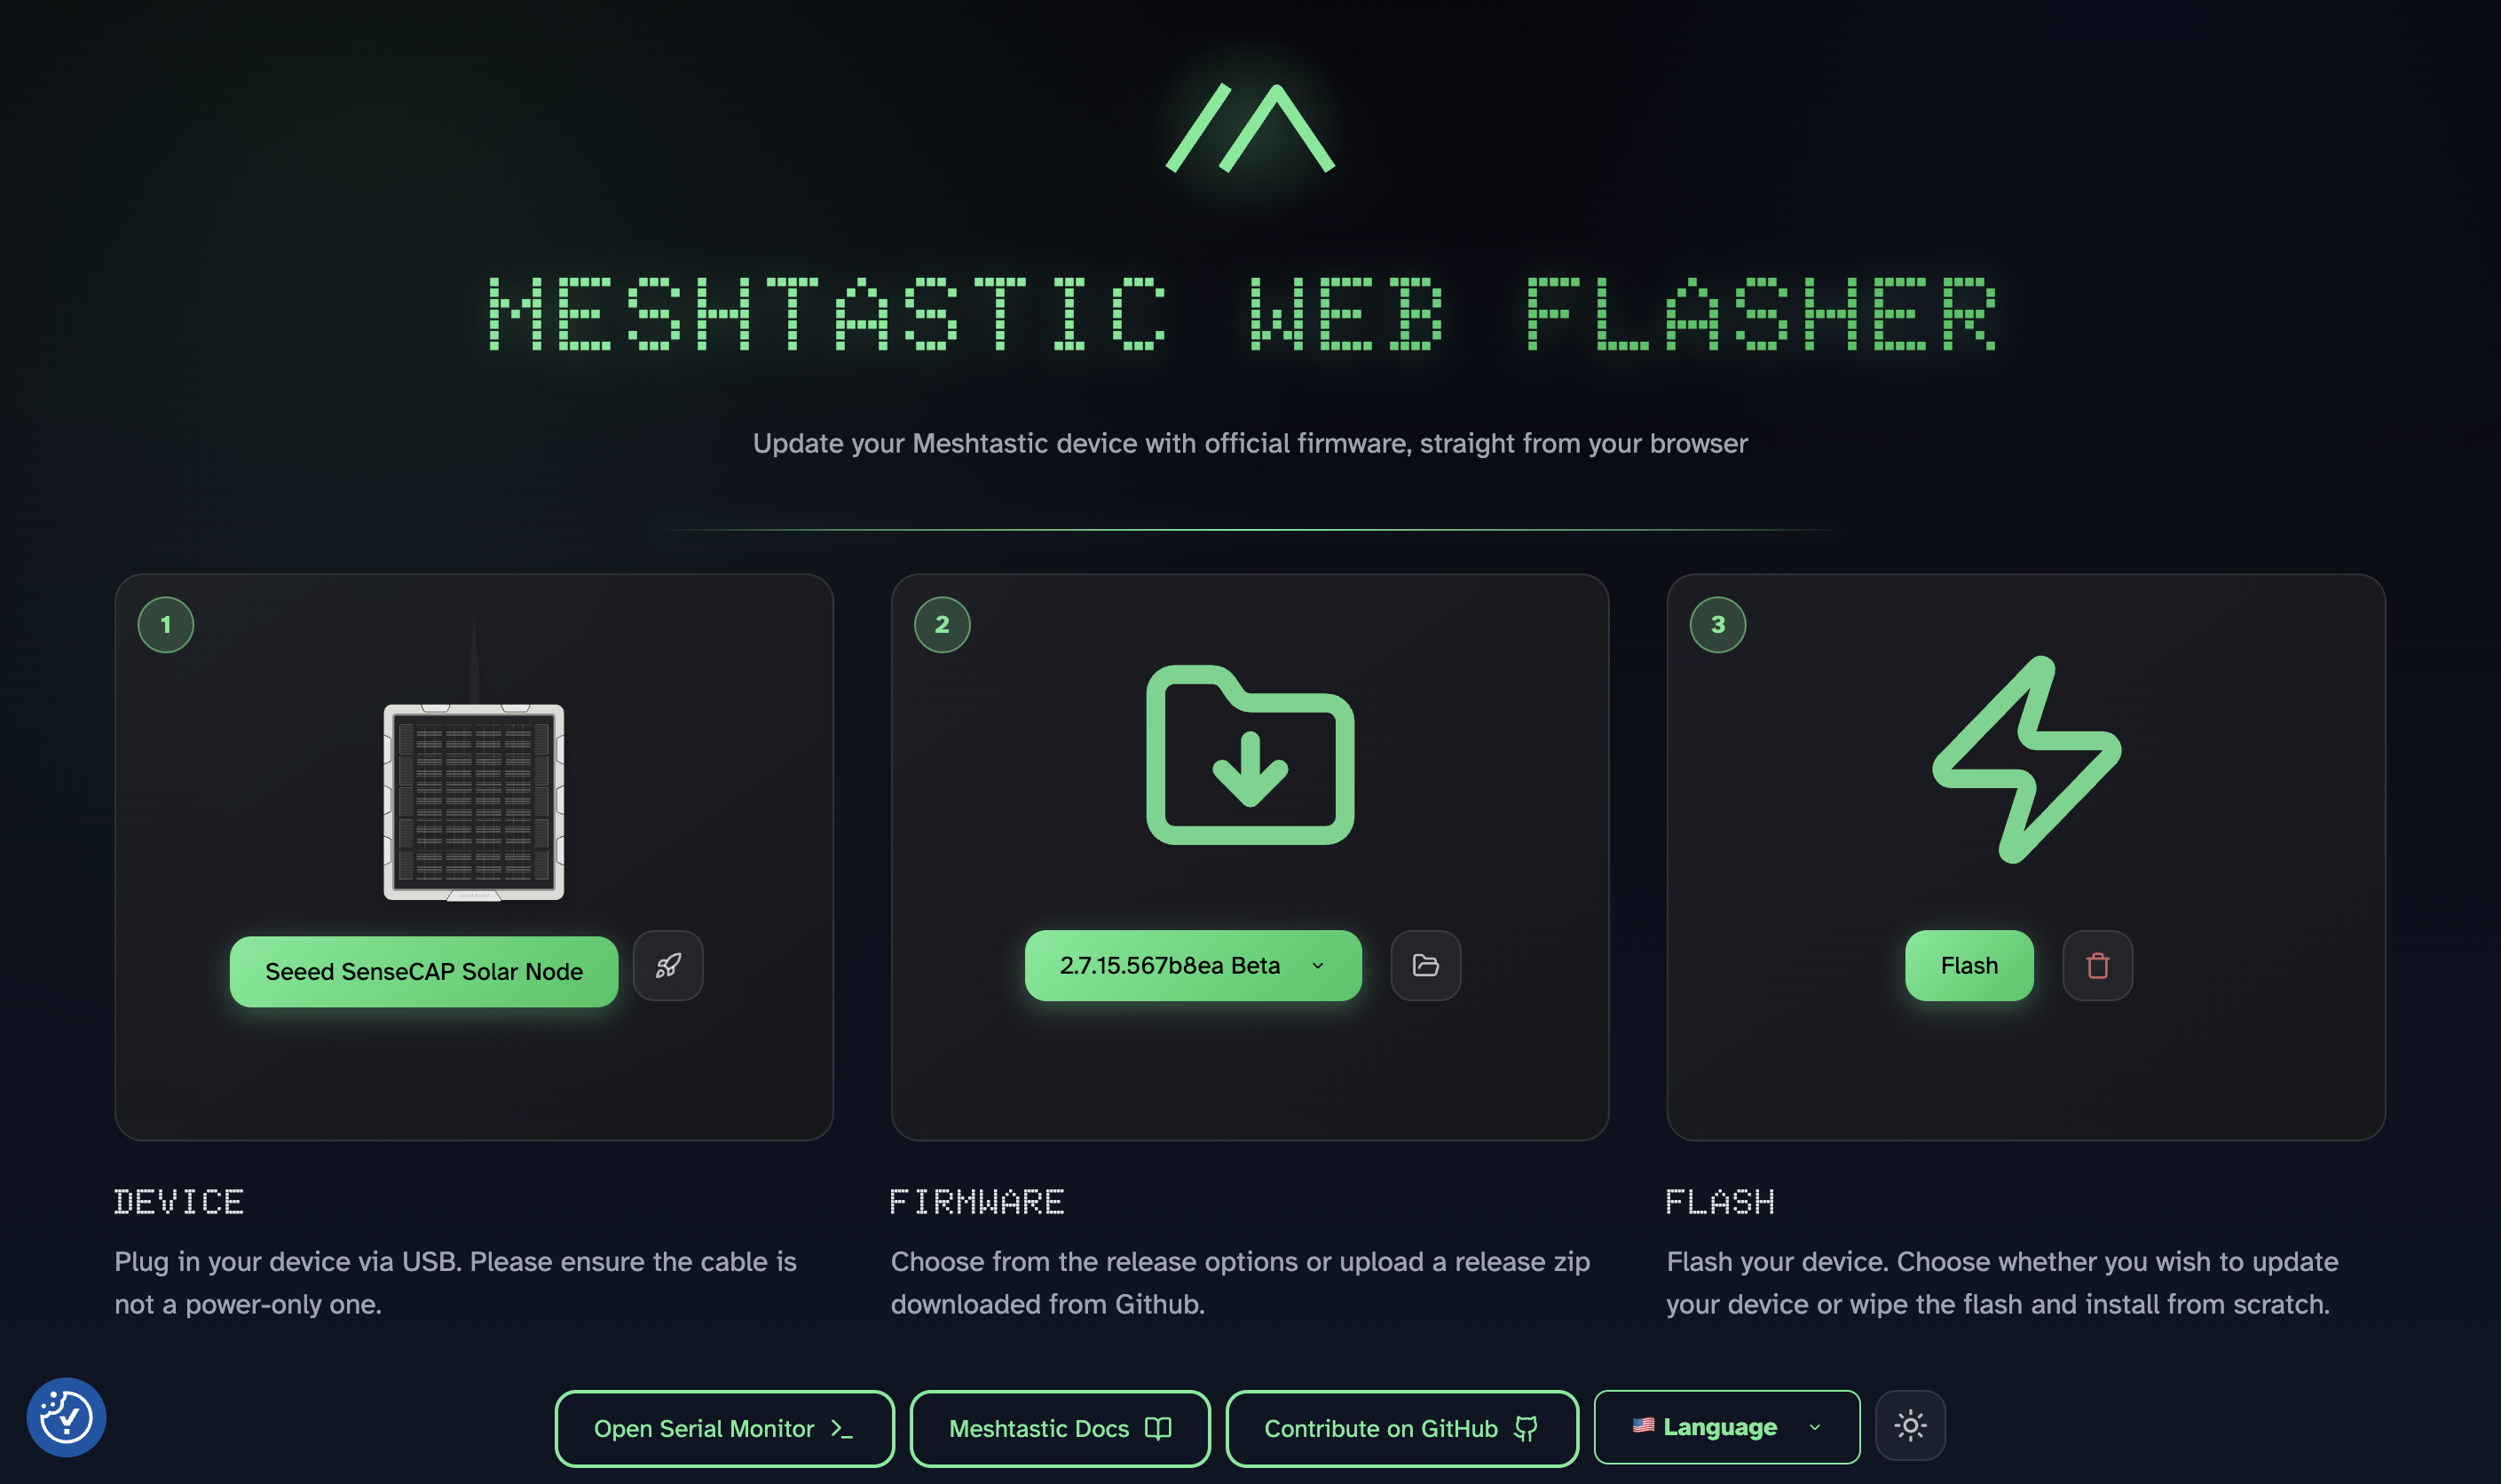
By way of Net Flasher (really useful):
- Go to flasher.meshtastic.org in Chrome or Edge
- Choose Seeed SenseCAP Photo voltaic Node from the gadget record
- Click on the trash icon to flash the erase firmware first, this step is obligatory on this gadget
- Click on Enter DFU Mode, the gadget will seem as a USB drive named
XIAO-xxx - Copy the erase UF2 file to the drive and watch for it to vanish
- Then choose your chosen firmware model and click on Flash
- Enter DFU mode once more, obtain the firmware UF2, and drag it to the drive
If the drive disconnects mid-copy, do not panic. That is regular nRF52 habits. The switch accomplished and the gadget is rebooting.
Mounting System

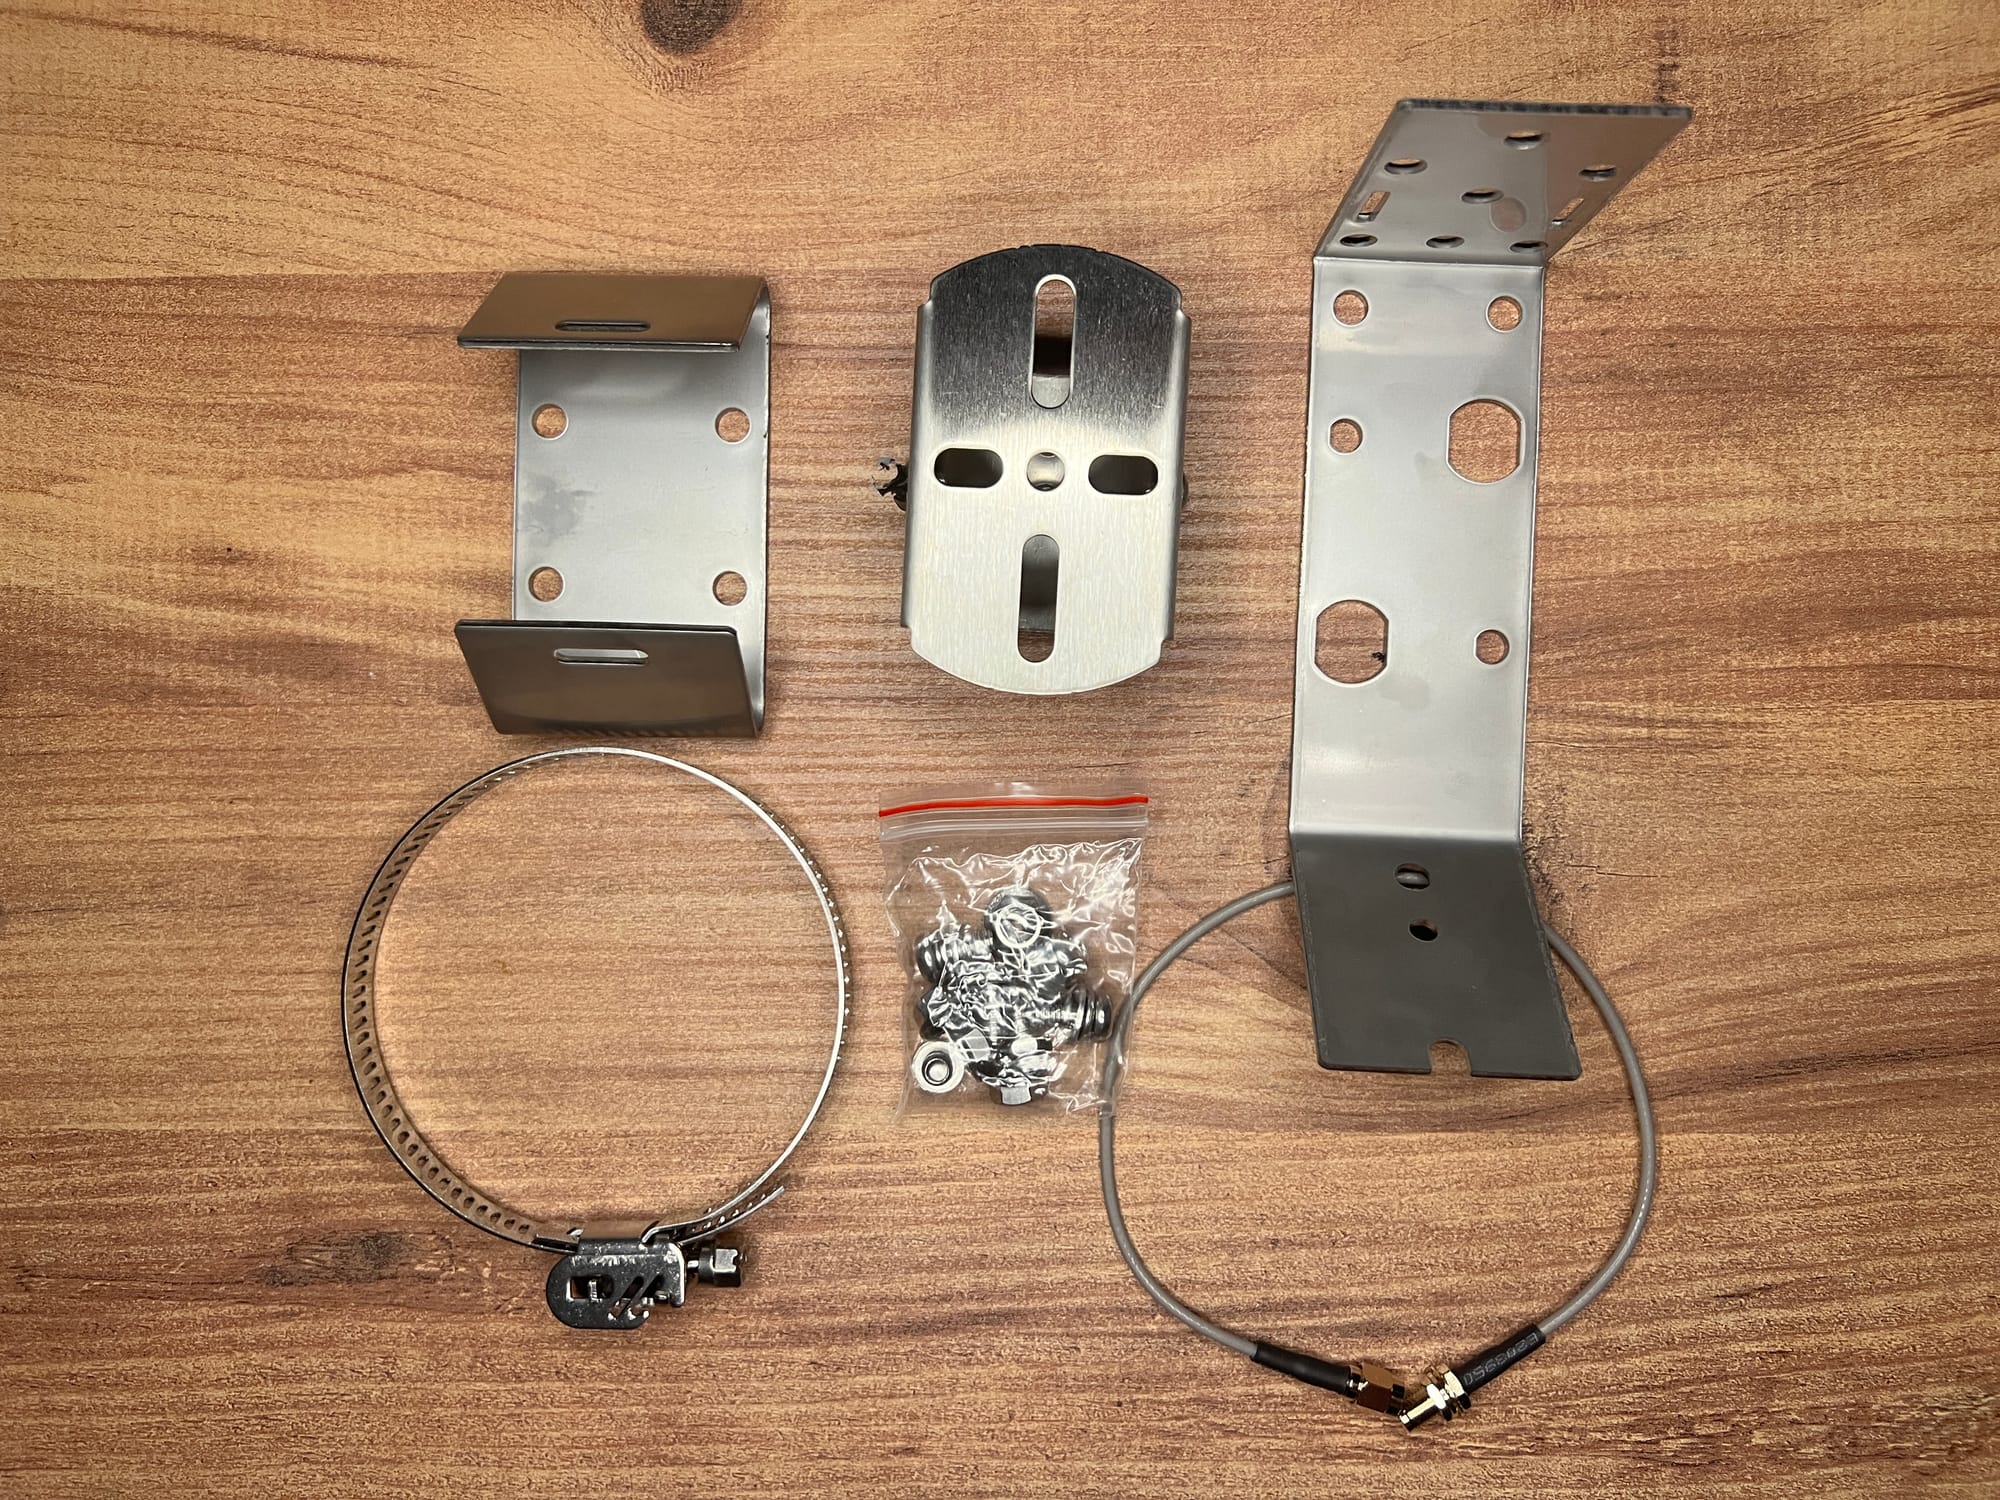
The mounting package deserves a correct part as a result of it is among the finest bundled mounting methods we have seen on a Meshtastic gadget at any value level.
Common Joint — screws into the 2 mounting holes on the again of the unit. Swivels up and down for tilt adjustment after the bracket is already fastened to the pole. This issues greater than it sounds: you mount the bracket as soon as, then fine-tune your photo voltaic panel angle individually. No repositioning the entire meeting.
Bracket Connector — hyperlinks the Common Joint to both a wall or the pole hoop system.
Hoop Bracket + Hoop Ring — that is the half that stunned us. Most pole mounting methods at this value vary offer you a worm-drive hose clamp, you rotate a screw to wind a metal band tighter round a pole, combating with it the entire manner, particularly one-handed on a ladder.
This isn’t that. The ring ring opens like a bracelet clasp. Open it, wrap it across the pole by hand, click on the clasp shut to lock it in place, then tighten with the screw. Open → wrap → click on → tighten. Performed. No feeding a band by way of a channel, no winding something, no combating. It really works on poles between 70–100mm diameter which covers most masts, gutters, and mounting poles you’d realistically use.
The included RF cable runs by way of a pre-drilled gap within the bracket connector, letting you place the antenna individually from the panel, helpful if you wish to run an extended aftermarket cable to get the antenna increased or in a greater RF place.
One sincere notice: these two mounting bolts connecting the unit to the Common Joint will elevate your eyebrow the primary time. In observe the load distribution works and the {hardware} is stable, however for those who’re in a high-wind surroundings, be certain that they’re correctly torqued earlier than strolling away.
Battery Life
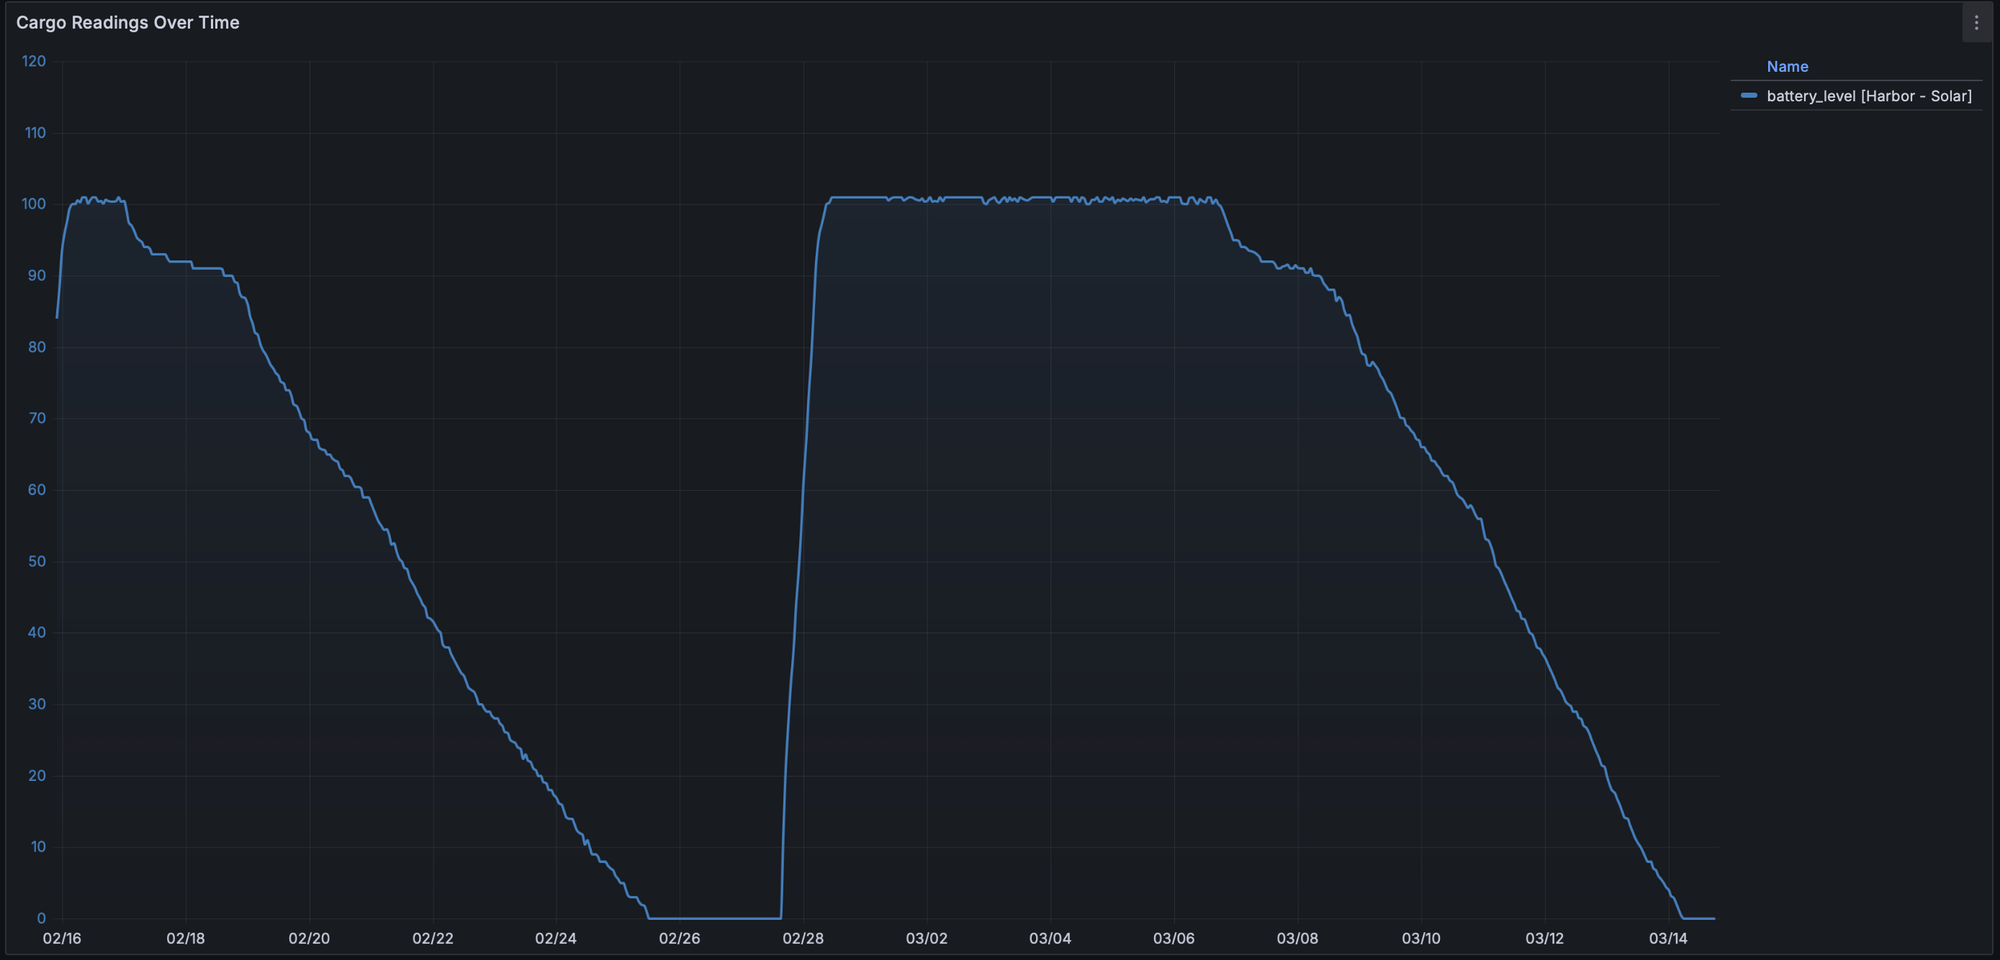
We tracked battery habits over a 27-day interval (February 16 – March 14) utilizing Grafana through Harbor Scale. Here is precisely what occurred, with no spin:
First cycle (Feb 16 – ~Feb 25): Unit working repeatedly, face-down on a desk with zero gentle publicity. Worst case situation. Drained from 100% to lifeless in roughly 9 days with no photo voltaic enter by any means.
Second cycle (Feb 28 – Mar 14): Recharged to 100% through USB-C, then positioned close to a window with minimal oblique gentle. Drained at an identical fee to the primary cycle, the restricted window gentle didn’t produce a significant distinction in drain velocity.
What this truly tells you: With zero photo voltaic enter, none, worst case, buried indoors, you’ve got roughly 9 days of runtime from battery alone. Outdoor with any actual solar publicity, that quantity modifications dramatically. One real-world consumer working their P1-Professional 43 ft up a tree with a 5.8dBi antenna swap studies their battery has by no means dropped beneath 87%. That is what precise outside photo voltaic deployment seems like.
Photo voltaic Charging
We weren’t capable of do managed outside photo voltaic testing, so let’s use Seeed’s personal consumption information and do the mathematics correctly.
Panel output: 5W peak, 5V 1A
Max charging present: 1A (restricted by the XIAO nRF52840 Plus at 200mA; charging IC CN3165 handles as much as 1A)
Complete battery capability: 4 × 3350mAh = 13,400mAh (~49.6Wh at 3.7V nominal)
Node consumption (nRF52840, router mode with GPS): roughly 30–80mW common relying on visitors and GPS replace fee
At 5W peak enter with ~75% cost effectivity, you are including roughly 3.75Wh again per peak solar hour.
Summer season (4 peak solar hours/day): ~15Wh generated vs ~0.7–2Wh consumed. Strongly web optimistic. Battery stays topped up.
Winter (1.5 peak solar hours/day): ~5.6Wh generated. Nonetheless possible web optimistic for many of Europe and North America even in winter.
Zero solar, worst case: ~9+ days of runtime from battery reserve alone, as confirmed by our telemetry.
Placement recommendation: Northern hemisphere, face the panel south. Southern hemisphere, face it north. Tilt angle ought to roughly match your latitude for finest year-round harvest. The Common Joint enables you to regulate this after mounting with out touching the bracket. A vertically mounted panel (on a wall) loses vital effectivity in comparison with a tilted south-facing mount, price contemplating when selecting your deployment spot.
USB-C Charging, Why This Issues Extra Than You Suppose
Most ready-to-deploy photo voltaic nodes use proprietary connectors or SP11 waterproof connectors. This one makes use of USB-C. That feels like a small element till you suppose by way of the precise eventualities:
It has been overcast for per week. The battery is getting low. Your node is already mounted. You wish to high it up with out pulling it down. With a proprietary connector, you want the particular cable, lose it and also you’re caught. With USB-C, you seize any energy financial institution, any laptop computer charger, any cable already in your bag.
Or you want to flash a firmware replace. With most mounted photo voltaic nodes you pull it down, unscrew the again, discover a cable, flash, reassemble, remount. With this one you carry a laptop computer and a USB-C cable up the ladder and also you’re accomplished on the spot. You do not even must open it.
In comparison with the magnetic puck chargers on the T1000-E and WisMesh Tag the place dropping the puck is an actual drawback, USB-C on a completely deployed photo voltaic node is a real win. The SP11 connectors on competing units just like the ThinkNode M6 are higher for climate sealing, no argument there, however the flexibility USB-C provides you for upkeep and area updates is difficult to interchange.
IP Ranking and Climate Resistance
Seeed charges the P1-Professional at IPX5, licensed to deal with sustained water jets from any route. For a completely mounted outside node, that is the baseline you need, and it is greater than most units on this class will put in writing.
The X in IPX5 is price understanding. We requested Seeed Studio instantly, and so they confirmed the gadget shouldn’t be mud rated particularly due to the USB-C port, that single opening is what prevents a full IP65 or increased certification. Some competing nodes just like the ThinkNode M6 do carry IP65, and if mud ingress is a real concern to your deployment surroundings, that is price factoring into your resolution.
That stated, we would push again on framing the USB-C port as a draw back. The pliability it provides you for area charging and firmware updates is genuinely invaluable on a completely mounted node, and it is price much more to us than a cleaner IP quantity on a spec sheet. The unit ships with a rubber cowl for the port, and it sits on the backside of the enclosure, so rain is not working instantly into it anyway. Cap it when it isn’t in use and you’ve got addressed the publicity level fully.
For the overwhelming majority of out of doors deployments, IPX5 plus the rubber cowl is greater than sufficient. Simply go in understanding what the score covers and what it would not.
Sensor Enlargement, The Grove Interface
The P1-Professional has a Grove IIC/GPIO/UART interface on the interior board. Open the unit, plug in a suitable sensor, shut it again up. It is plug-and-play inside.
Seeed has verified compatibility with these sensors:
| Sensor Sort | Appropriate Fashions |
|---|---|
| Stress | BMP085 |
| Temperature | MCP9808, PCT2075 |
| Temperature & Humidity | SHT31, SHTC3, SHT4X, AHT10 |
| Temp + Humidity + Stress | BME280 |
| Coronary heart Fee & SpO₂ | MAX30102 |
| I2C Keyboard | CardKB |
The BME280 is probably the most related for many deployments, temperature, humidity, and barometric stress in a single sensor, and Meshtastic already has telemetry help for environmental information. With a BME280 plugged in, this photo voltaic node can double as a climate station broadcasting atmospheric information over the mesh. One thing no different gadget on this value vary can do out of the field.
One factor to notice: the sensor sits contained in the sealed enclosure when put in, so temperature readings replicate inner ambient temperature, not true outside air temp. That hole issues relying on how a lot direct solar hits the enclosure and the way lengthy it has been working. Price holding in thoughts when deciphering environmental telemetry.
All the time examine present Meshtastic firmware notes for which sensors are actively supported earlier than buying one for this use case, firmware help continues to evolve.
That is additionally one thing Seeed may develop on in a future iteration. The Elecrow ThinkNode M6 has twin exterior waterproof SP11 sensor connectors, which suggests you may run sensors exterior the enclosure with out opening something. For a climate station use case that is a significant benefit. One thing to contemplate for P1-Professional v2.
The Competitors
The P1-Professional at $89.90 is one in all only a few ready-to-go photo voltaic Meshtastic nodes with GPS and batteries included. Here is the complete image:
Elecrow ThinkNode M6 — ~$80 6W panel (larger than the P1-Professional’s 5W), 7000mAh throughout 2 Panasonic cells, IP65, twin exterior SP11 waterproof sensor connectors (benefit for exterior sensing), separate GPS and LoRa antennas. On paper it is a real competitor, bigger panel, exterior sensor ports, related value. We have not acquired our evaluate unit but so we can’t give a full verdict, however watch this house. Battery capability is 7000mAh vs 13,400mAh, the P1-Professional wins that comparability considerably although the M6 makes use of high quality Panasonic cells. Additionally the M6 comes solely with plastic wall mount so for pole mounting that’s one thing you’ll have to DIY by yourself.
RAK WisMesh Repeater Mini — $99 IP67, 3200mAh battery, built-in photo voltaic panel. Prices greater than the P1-Professional and delivers 3200mAh vs 13,400mAh. That isn’t a aggressive comparability on battery. You are paying for the IP67 score and the RAK model, each of which have questionable worth, for many neighborhood mesh deployments the P1-Professional’s reserve capability is price extra in observe than an IP score step up, particularly at a cheaper price.
RAK WisMesh Repeater — $299 A very completely different class of gadget. Exterior 5.2Ah/56Wh photo voltaic battery pack, correct weatherized connectors, heavy-duty industrial construct, IP67. We have now a evaluate unit and the complete devoted evaluate is coming, subscribe for those who do not wish to miss it. When you want enterprise-grade reliability for a mission-critical or skilled set up, that is the gadget. For everybody else constructing out a neighborhood mesh, it is vital overkill at greater than thrice the value.
The worth verdict: Seeed Studio discovered the candy spot once more. The identical transfer they made with the T1000-E, sufficient {hardware} to do the job correctly, nothing wasted, a value that makes each competitor’s argument more durable to make. At $89.90 with 4 recent 18650s, GPS, mounting package, and USB-C charging, the P1-Professional wins the worth argument clearly.
Vary Check
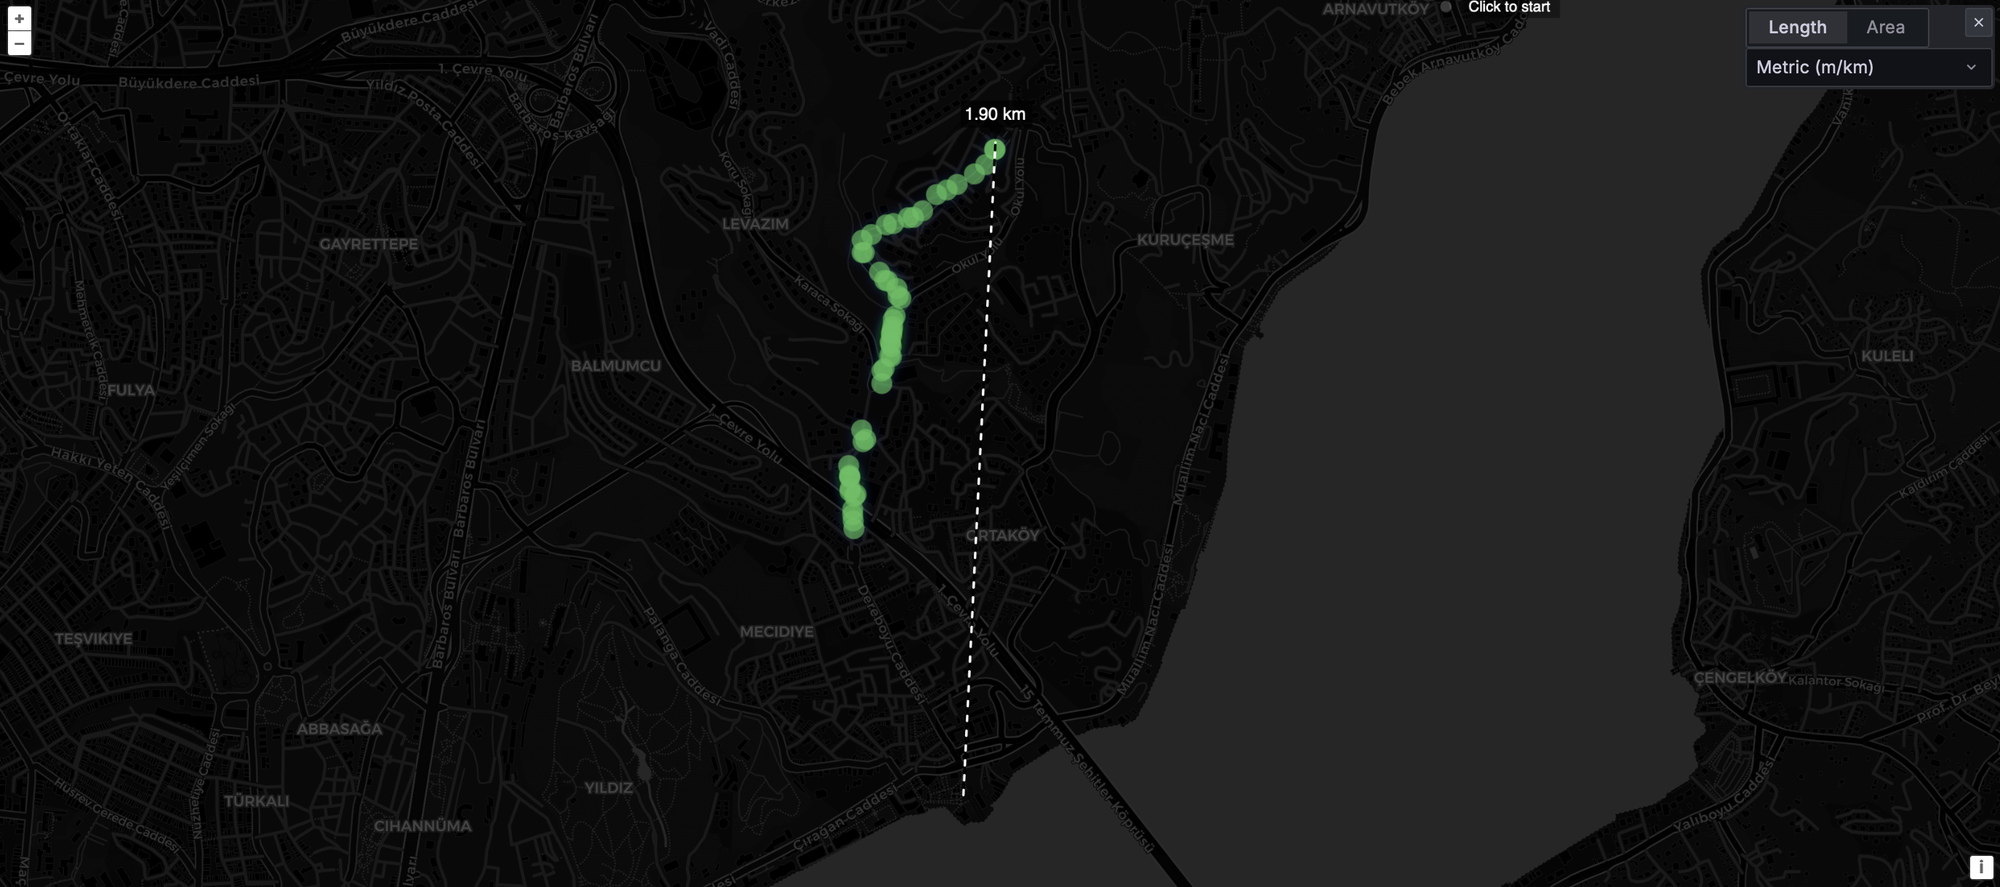
For this take a look at we switched our ordinary setup. Usually the bottom station is the T1000-E, however since we reviewed the WisMesh Tag and its sign was wonderful, we used it because the fastened base for this take a look at. The Photo voltaic Node P1-Professional was the strolling unit.
The consequence was spectacular ~1.90km in a dense city surroundings, constant acknowledged packets all through the route earlier than we referred to as the take a look at off. The sign did not die gracefully on the edge, it simply saved working, which is what you wish to see.
Now the sincere caveat, as a result of we all the time say this: take vary checks with a grain of salt. These should not scientific, managed experiments. Environmental variables, constructing density, elevation modifications, and even which route you are strolling all have an effect on outcomes. We have seen the identical antenna class carry out very in a different way throughout checks.
That stated, the result’s according to what we have gotten from the T1000-E and WisMesh Tag in related circumstances, and people are two of the best-performing compact Meshtastic units we have examined. Past the ~1.9km constant vary, there have been some further packets that made it by way of at better distance, however these have been sporadic fairly than dependable. Take into account the constant vary the actual quantity.
One factor price flagging: we examined the SenseCAP Indicator beforehand, which makes use of the identical 2dBi antenna class, and received noticeably worse vary. It is potential the Indicator’s base was a T1000-E that was limiting issues, or there have been environmental variables we could not management. The inventory antenna high quality on these units might also not be completely constant batch to batch. We have seen that sample earlier than.
What this implies virtually: the inventory 2dBi antenna performs fantastic and you do not essentially have to swap it immediately. The vary is aggressive with the perfect compact Meshtastic units we have examined. However, and that is the photo voltaic node particular level, if you are going to mount this someplace arduous to entry, like on a roof or excessive up a pole, do the antenna improve earlier than you mount it. Swapping an antenna on a tool you may attain is straightforward. Doing it 4 meters up a pole shouldn’t be.
What to Know Earlier than You Purchase
The antenna immediately. As we noticed within the vary take a look at, the inventory 2dBi performs competitively with the perfect compact Meshtastic units we have examined. So do not feel just like the gadget is handicapped out of the field. That stated, 2dBi is what nearly each photo voltaic node ships with at this value level, even the RAK WisMesh Repeater at $300 ships with a fundamental antenna, which at that value is much less forgivable. If you wish to push additional, the SMA connector and included RF cable make upgrading straightforward. Seeed themselves advocate the 3dBi 860–930MHz fiberglass because the logical subsequent step, or the 5.8dBi 902–928MHz fiberglass for high-elevation deployments. One consumer working the 5.8dBi improve 43 ft up a tree is pulling constant 31-mile contacts in Florida. A photo voltaic node rewards antenna funding greater than any EDC tracker ever will, it is sitting in a single spot all day, elevated, and the antenna is the one variable you management after deployment.
USB-C charging is an even bigger deal than the spec sheet makes it sound. Already lined above, however price repeating right here as a shopping for level.
IPX5 rated with a rubber USB-C cowl included, with a caveat. Seeed does publish an IPX5 score for this gadget, which covers sustained water jets, ok for rain. The limiting issue is the USB-C port: IPX5 would not cowl mud ingress in any respect (that requires an IP6X mud score). When you’re deploying in a dusty surroundings, a small piece of tape over the USB-C port when it isn’t in use solves that fully. Easy repair, price understanding.”
Button-top 18650s just for alternative. Flat-top cells will not make dependable contact with the holder. File that away.
The GPS is for timing, not monitoring. It is a fastened node. GPS earns its place by way of mesh timing synchronization, not place reporting. If you would like a shifting asset tracker, that is the flawed gadget.
Do not use NRF-OTA for firmware updates. Use the Net Flasher. Flash erase firmware first. That is in Seeed’s documentation and it is price taking severely.
Ultimate Verdict
The SenseCAP Photo voltaic Node P1-Professional is the perfect worth photo voltaic Meshtastic node you should buy proper now.
9-plus days of battery runtime with zero photo voltaic enter. A 5W panel that retains it working indefinitely underneath actual outside circumstances. 4 3350mAh cells included. USB-C backup charging. A mounting system, particularly that bracelet-clasp hoop ring, that’s genuinely higher than what most units bundle at this value or increased. Grove sensor growth that may flip it right into a mesh-connected climate station. Pre-flashed, able to pair, FCC and CE licensed.
The trade-offs are: no official IP score, 2dBi inventory antenna you will wish to improve, inner sensor placement and by some means a technique to brick it if not cautious (severely seeed studio that is second gadget with identical subject!), None of those are dealbreakers.
At $89.90 it’s arduous to seek out one thing to hate it for, that is the T1000-E play over again. Seeed Studio discovered the value the place everybody else’s argument falls aside. When you’re constructing out your mesh community and also you want a everlasting photo voltaic node that simply works, that is the place you begin.
If you would like the naked bones model with out batteries and GPS to maintain prices down or use your personal elements, the P1 at $69.90 is similar gadget with extra flexibility.