Amazon Q Business is a generative synthetic intelligence (AI)-powered assistant designed to boost enterprise operations. It’s a totally managed service that helps present correct solutions to customers’ questions whereas honoring the safety and entry restrictions of the content material. It may be tailor-made to your particular enterprise wants by connecting to your organization’s info and enterprise techniques utilizing built-in connectors to quite a lot of enterprise knowledge sources. Amazon Q Enterprise permits customers in numerous roles, corresponding to advertising managers, undertaking managers, and gross sales representatives, to have tailor-made conversations, remedy enterprise issues, generate content material, take motion, and extra, by way of an online interface. This service goals to assist make staff work smarter, transfer quicker, and drive important influence by offering speedy and related info to assist them with their duties.
One such enterprise knowledge repository you should utilize to retailer content material is Atlassian Confluence. Confluence is a group workspace that gives a spot to create, and collaborate on numerous initiatives, merchandise, or concepts. Group areas assist your groups construction, set up, and share work, so every person has visibility into the institutional information of the enterprise and entry to the knowledge they want or solutions to the questions they’ve.
There are two Confluence offerings:
- Cloud – That is supplied as a software program as a service (SaaS) product. It’s all the time on and repeatedly up to date.
- Data Center (self-managed) – Right here, you host Confluence in your infrastructure, which can be on premises or the cloud, permitting you to maintain knowledge inside your chosen atmosphere and handle it your self.
Your customers could must get solutions in Amazon Q Enterprise from the content material in Atlassian’s Confluence Cloud occasion as part of their work. For this you will want to configure an Amazon Q Confluence Cloud connector. As part of this configuration, one of many steps is to configure the authentication of the connector in order that it might probably authenticate with Confluence (Cloud) after which index the related content material.
This submit covers the steps to configure the Confluence Cloud connector for Amazon Q Enterprise.
Forms of paperwork
If you join Amazon Q to an information supply, what Amazon Q considers—and crawls—as a document varies by connector. The Confluence Cloud connector crawls the next as paperwork:
- Areas – Every house is taken into account a single doc.
- Pages – Every web page is taken into account a single doc.
- Blogs – Every weblog is taken into account a single doc.
- Feedback – Every remark is taken into account a single doc.
- Attachments – Every attachment is taken into account a single doc.
Metadata
Each doc has structural attributes—or metadata—connected to it. Doc attributes can embody info corresponding to doc title, doc creator, time created, time up to date, and doc sort.
If you join Amazon Q Enterprise to an information supply, it routinely maps particular knowledge supply document attributes to fields inside an Amazon Q Enterprise index. If a doc attribute in your knowledge supply doesn’t have an attribute mapping already out there, or if you wish to map further doc attributes to index fields, use the {custom} area mappings to specify how a knowledge supply attribute maps to an Amazon Q Enterprise index area. You create area mappings by enhancing your knowledge supply after your software and retriever are created.
To study extra in regards to the supported entities and the related reserved and {custom} attributes for the Amazon Q Confluence connector, discuss with Amazon Q Business Confluence (Cloud) data source connector field mappings.
Authentication sorts
An Amazon Q Enterprise software requires you to make use of AWS IAM Identity Center to handle person entry. Though it’s really helpful to have an IAM Id Middle occasion configured (with customers federated and teams added) earlier than you begin, it’s also possible to select to create and configure an IAM Id Middle occasion in your Amazon Q Enterprise software utilizing the Amazon Q console.
You may also add customers to your IAM Id Middle occasion from the Amazon Q Enterprise console, when you aren’t federating id. If you add a brand new person, ensure that the person is enabled in your IAM Id Middle occasion they usually have verified their electronic mail ID. They should full these steps earlier than they’ll log in to your Amazon Q Enterprise internet expertise.
Your id supply in IAM Id Middle defines the place your customers and teams are managed. After you configure your id supply, you may lookup customers or teams to grant them single sign-on entry to AWS accounts, functions, or each.
You may have just one id supply per group in AWS Organizations. You may select one of many following as your id supply:
- IAM Id Middle listing – If you allow IAM Identity Center for the primary time, it’s routinely configured with an IAM Id Middle listing as your default id supply. That is the place you create your customers and teams, and assign their stage of entry to your AWS accounts and functions.
- Lively Listing – Select this selection if you wish to proceed managing customers in both your AWS Managed Microsoft AD listing utilizing AWS Directory Service or your self-managed listing in Lively Listing (AD).
- Exterior Id Supplier – Select this selection if you wish to handle customers in different external identity providers (IdPs) by way of the Safety Assertion Markup Language (SAML) 2.0 normal, corresponding to Okta.
Entry management lists
Amazon Q Enterprise connectors index entry management checklist (ACL) info that’s connected to a Confluence doc together with the doc itself. For doc ACLs, Amazon Q Enterprise indexes the next:
- Person electronic mail tackle
- Group title for the native group
- Group title for the federated group
If you join a Confluence (Cloud) knowledge supply to Amazon Q Enterprise, the connector crawls ACL (person and group) info connected to a doc out of your Confluence (Cloud) occasion. The data is used to find out which content material can be utilized to assemble chat responses for a given person, in accordance the end-user’s doc entry permissions.
You configure person and group entry to Confluence areas utilizing the house permissions web page, in Confluence. Equally for pages and blogs, you employ the restrictions web page. For extra details about house permissions, see Space Permissions Overview on the Confluence Assist web site. For extra details about web page and weblog restrictions, see Page Restrictions on the Confluence Assist web site.
An Amazon Q Enterprise connector updates any adjustments in ACLs every time that your knowledge supply content material is crawled. To seize ACL adjustments to ensure that the correct end-users have entry to the correct content material, re-sync your knowledge supply often.
Id crawling for Amazon Q Enterprise Person Retailer
As said earlier, Amazon Q Enterprise crawls ACL info on the doc stage from supported knowledge sources. As well as, Amazon Q Enterprise crawls and shops principal info inside every knowledge supply (native person alias, native group, and federated group id configurations) into the Amazon Q Enterprise Person Retailer. That is helpful when your software is related to a number of knowledge sources with totally different authorization and authentication techniques, however you wish to create a unified, access-controlled chat expertise in your end-users.
Amazon Q Enterprise internally maps the native person and group IDs connected to the doc, to the federated identities of customers and teams. Mapping identities streamlines person administration and accelerates chat responses by lowering ACL info retrieval time throughout chat requests. Identity crawling, together with the authorization characteristic, helps filter and generate internet expertise content material restricted by end-user context. For extra details about this course of, see Understanding Amazon Q Business User Store.
The group and person IDs are mapped as follows:
- _group_ids – Group names are current on areas, pages, and blogs the place there are restrictions. They’re mapped from the title of the group in Confluence. Group names are all the time lowercase.
- _user_id – Usernames are current on the house, web page, or weblog the place there are restrictions. They’re mapped relying on the kind of Confluence occasion that you simply’re utilizing. For Confluence Cloud, the _user_id is the account ID of the person.
Overview of answer
With Amazon Q Enterprise, you may configure a number of knowledge sources to supply a central place to go looking throughout your doc repository. For our answer, we display how you can index a Confluence repository utilizing the Amazon Q Enterprise connector for Confluence. On this weblog we’ll:
- Configure an Amazon Q Enterprise Software.
- Join Confluence (Cloud) to Amazon Q Enterprise.
- Index the information within the Confluence repository.
- Run a pattern question to check the answer.
Conditions
Earlier than you start utilizing Amazon Q Enterprise for the primary time, full the next duties:
- Set up your AWS account.
- Optionally, install the AWS Command Line Interface (AWS CLI).
- Optionally, set up the AWS SDKs.
- Consider AWS Regions and endpoints.
- Set up required permissions.
- Enable and configure an IAM Identity Center instance.
For extra info, see Setting up for Amazon Q Business.
To arrange the Amazon Q Enterprise connector for Confluence, that you must full further stipulations. For extra info, see Prerequisites for connecting Amazon Q Business to Confluence (Cloud).
Create an Amazon Q Enterprise software with the Confluence Cloud connector
As step one in direction of making a generative AI assistant, you configure an software. Then you choose and create a retriever, and in addition join any knowledge sources. After this, you grant end-user entry to customers to work together with an software utilizing the popular id supplier, IAM Id Middle. Full the next steps:
- On the Amazon Q Enterprise console, select Get began.
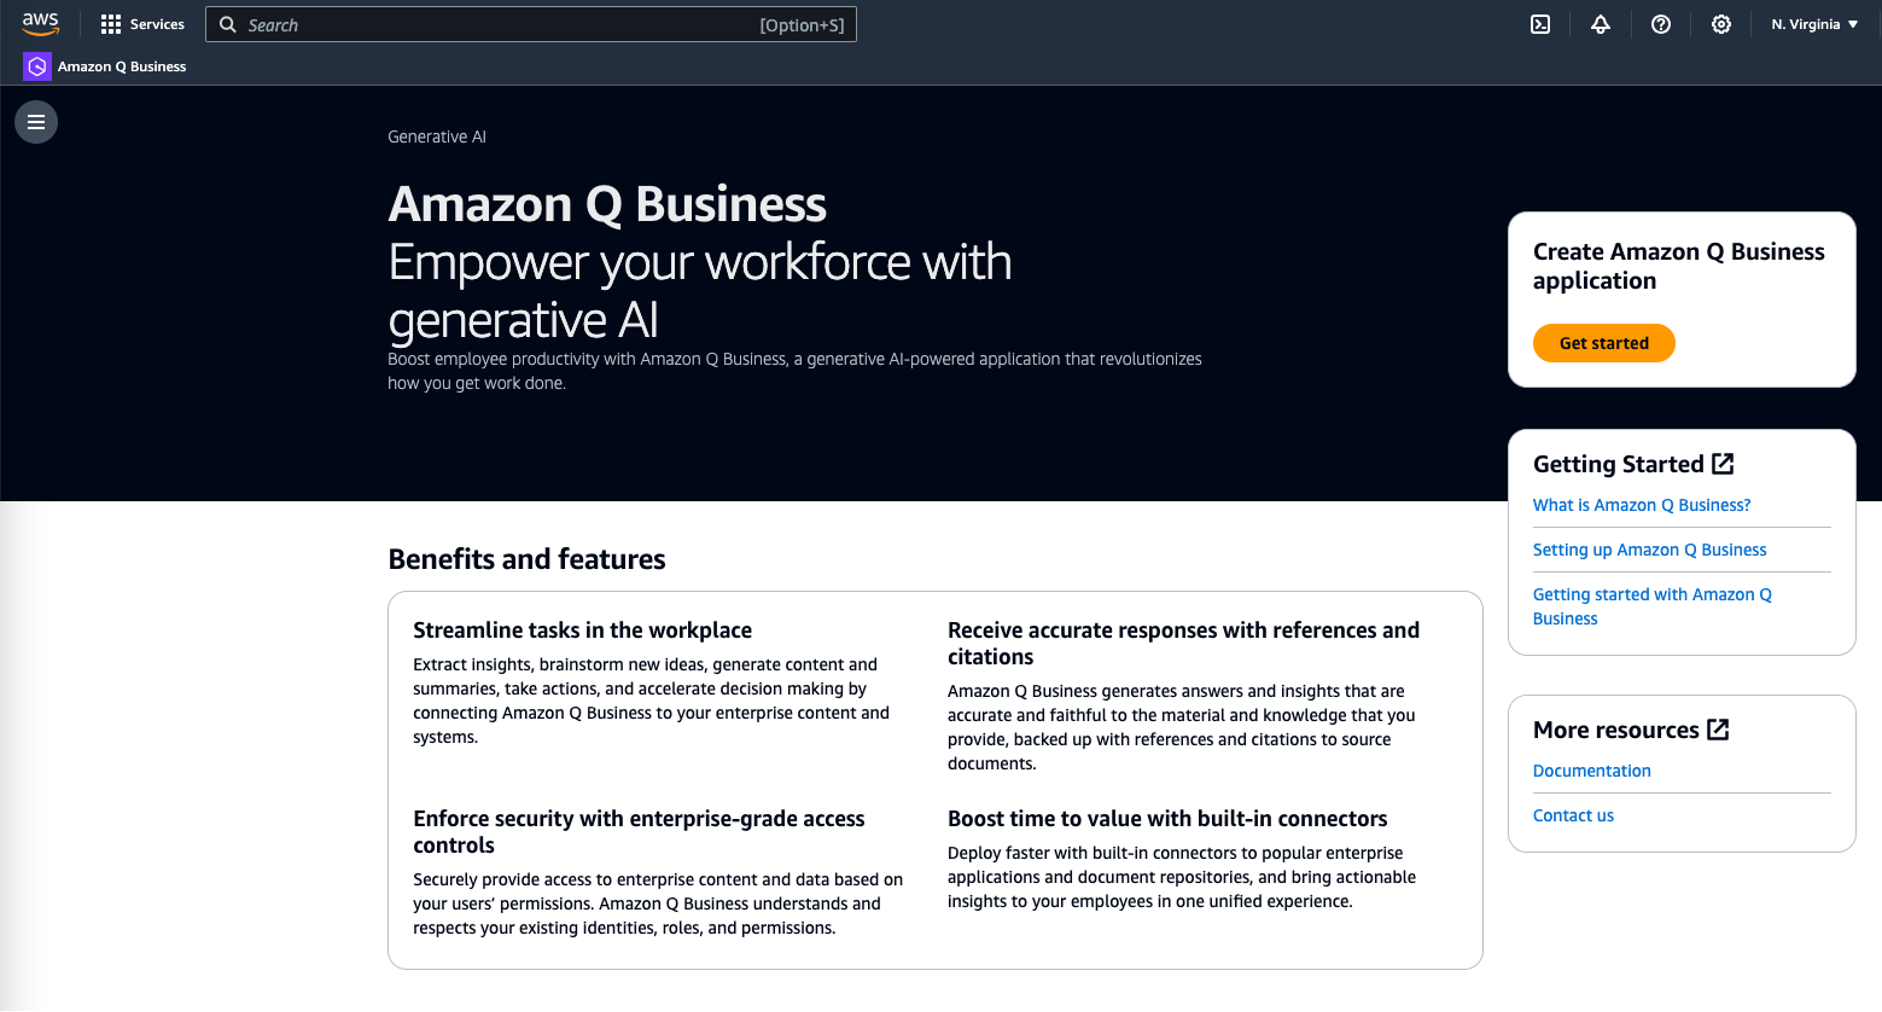
Determine 1: Preliminary Amazon Q for Enterprise house web page
- On the Purposes web page, select Create software.
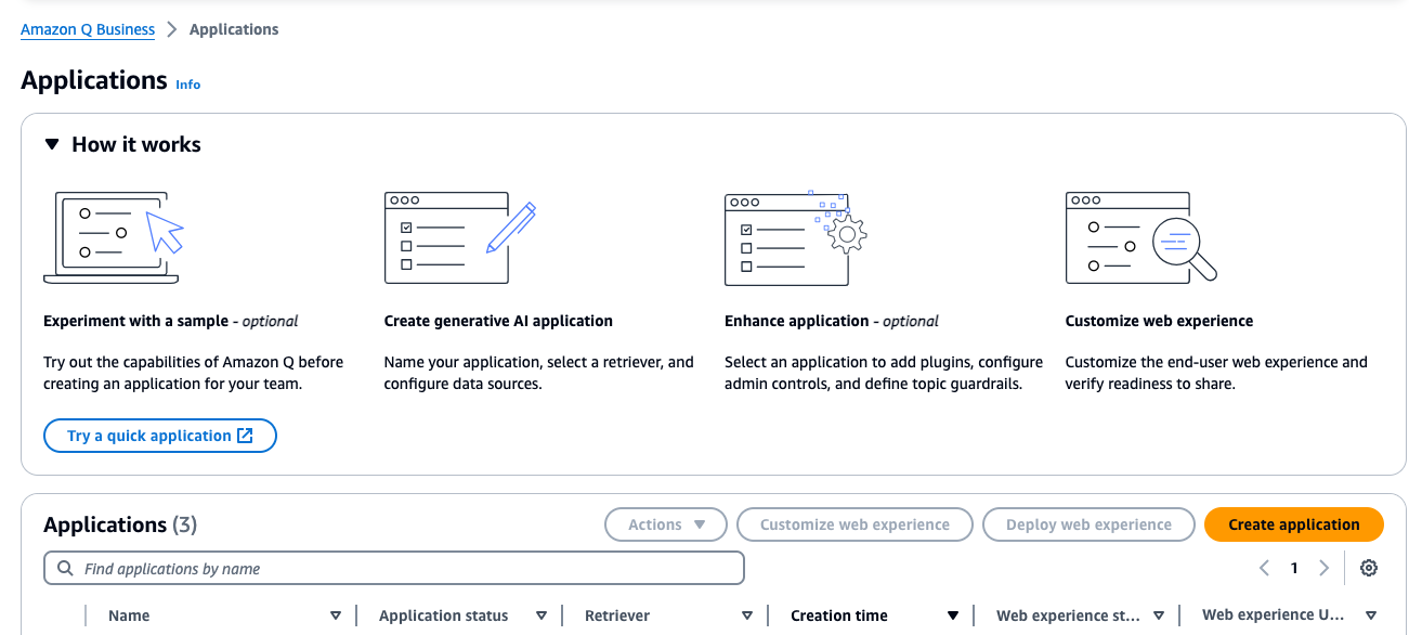
Determine 2: Amazon Q for Enterprise software creation web page
- Enter a reputation in your software, choose the extent of service entry, and connect with IAM Identity Center. (Notice: The IAM Id Middle occasion doesn’t must be in the identical Area as Amazon Q Enterprise.)
- Select Create.
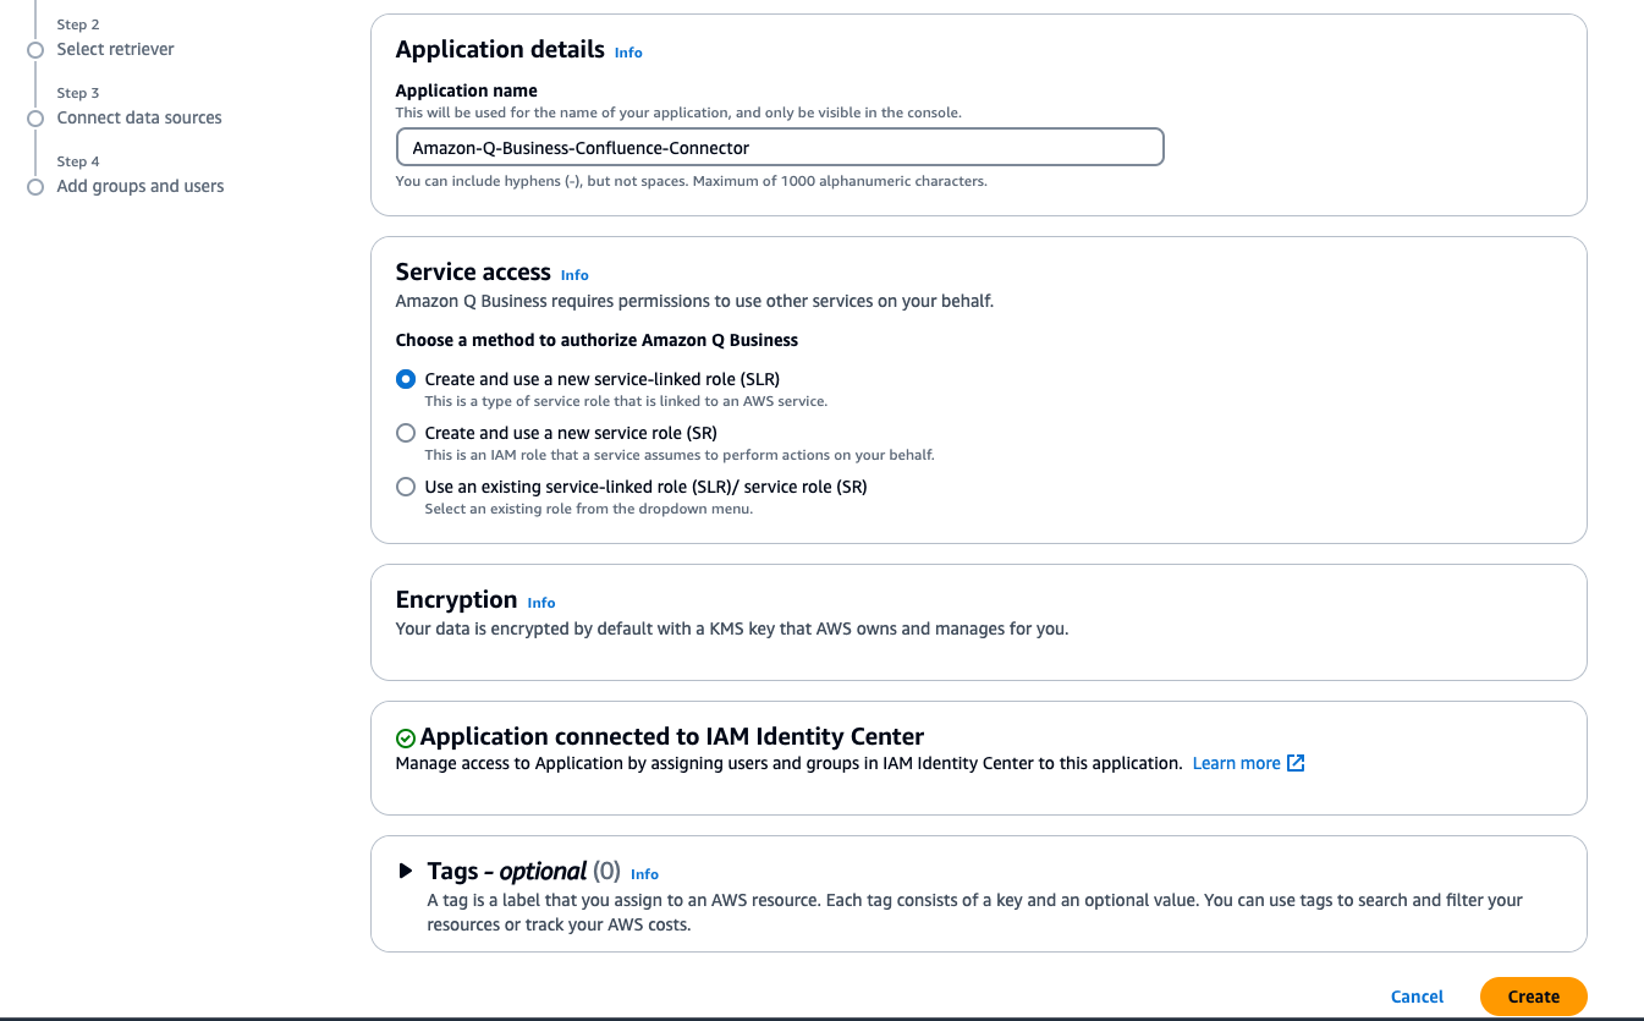
Determine 3: Amazon Q for Enterprise software configuration web page
For extra particulars on configuring the Amazon Q software and connecting to IAM Id Middle, discuss with Creating an Amazon Q Business application environment.
- Choose your retriever and index provisioning choices.
- Select Subsequent.
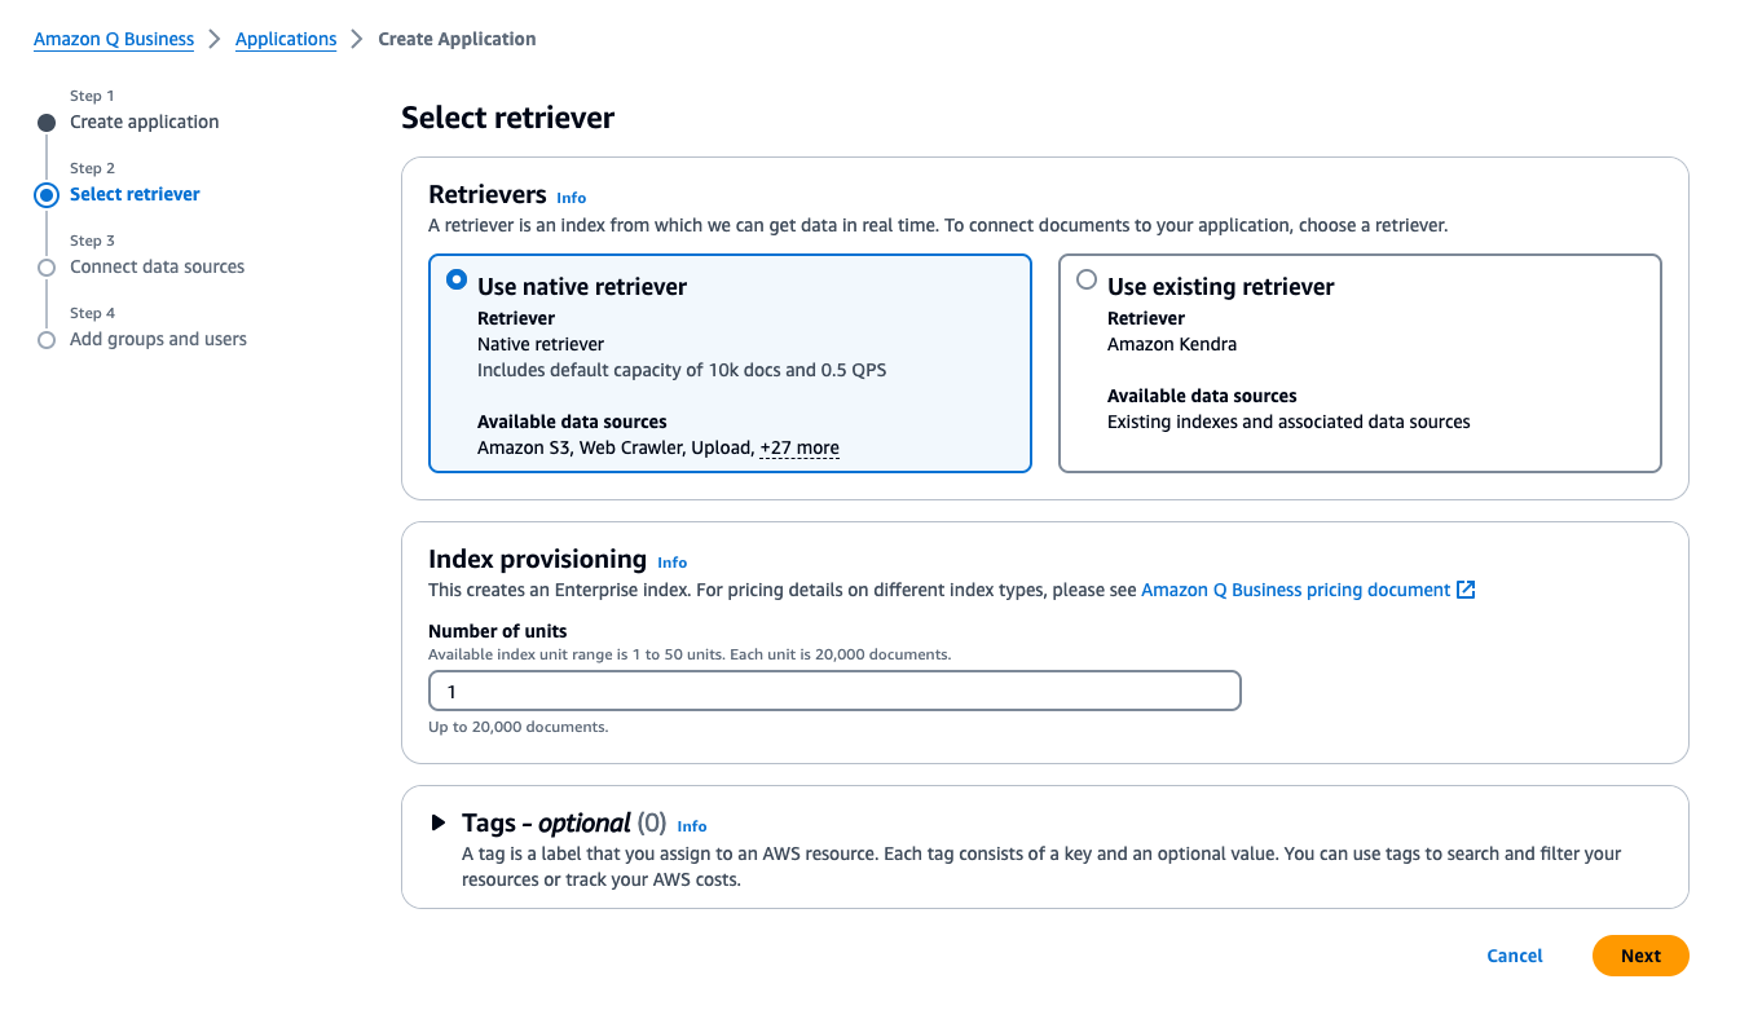
Determine 4: Amazon Q for Enterprise retriever choice web page
For extra particulars on creating and deciding on a retriever, discuss with Creating and selecting a retriever for an Amazon Q Business application.
- Connect with Confluence as your knowledge supply.
- Enter a reputation and outline.
- Choose Confluence Cloud because the supply and enter your Confluence URL.
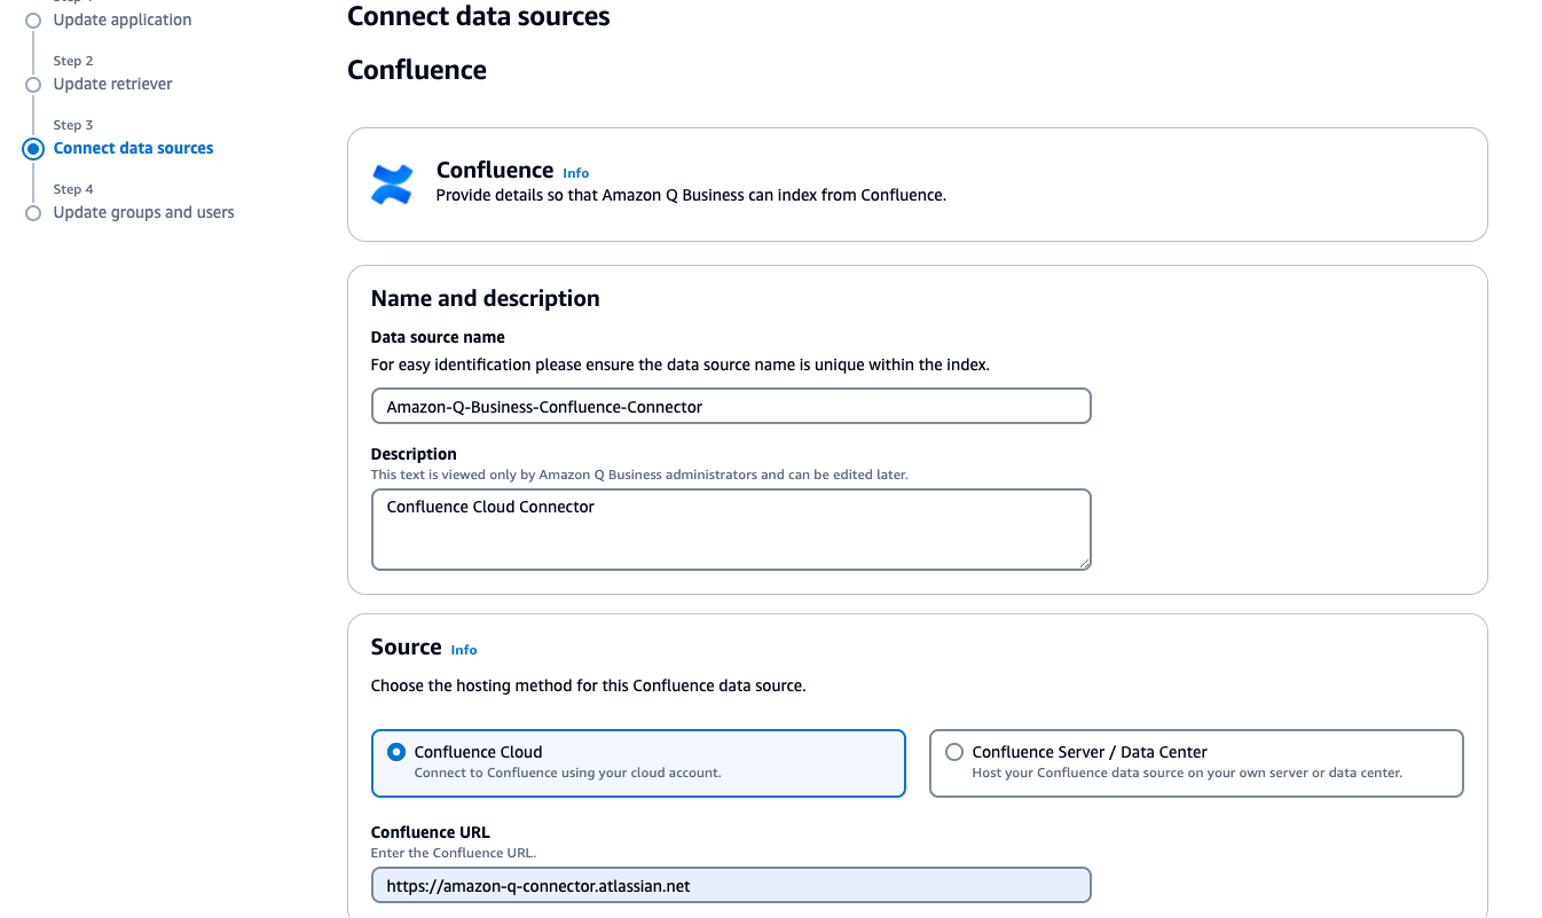
Determine 5: Confluence connector web page
- There are two choices for Authentication: Primary authentication and OAuth 2.0 authentication. Choose the most suitable choice relying in your use case.
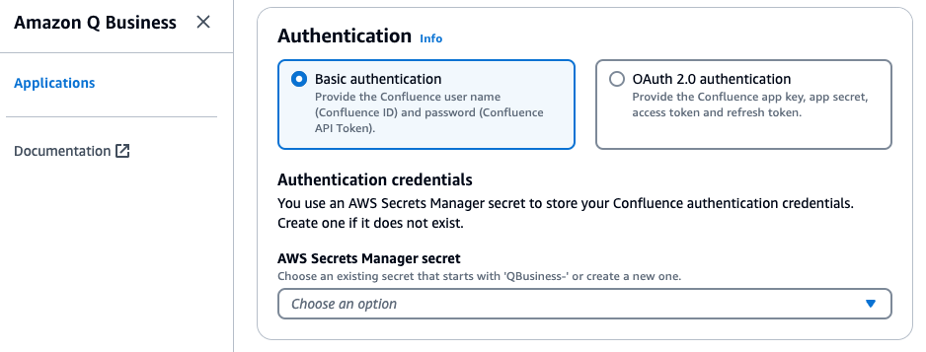
Determine 6: Confluence connector authentication choices
Earlier than you join Confluence (Cloud) to Amazon Q Enterprise, that you must create and retrieve the Confluence (Cloud) credentials you’ll use to attach Confluence (Cloud) to Amazon Q Enterprise. You additionally want so as to add any permissions wanted by Confluence (Cloud) to connect with Amazon Q Enterprise.
The next procedures offer you an summary of how you can configure Confluence (Cloud) to connect with Amazon Q Enterprise utilizing both fundamental authentication or OAuth 2.0 authentication.
Configure Confluence (Cloud) fundamental authentication for Amazon Q Enterprise
Full the next steps to configure fundamental authentication:
- Log in to your account from Confluence (Cloud). Notice the username you logged in with. You will want this later to connect with Amazon Q Enterprise.
- Out of your Confluence (Cloud) house web page, observe your Confluence (Cloud) URL out of your Confluence browser URL. For instance, https://instance.atlassian.internet. You will want this later to connect with Amazon Q Enterprise.
- Navigate to the Security web page in Confluence (Cloud).
- On the API tokens web page, select Create API token.
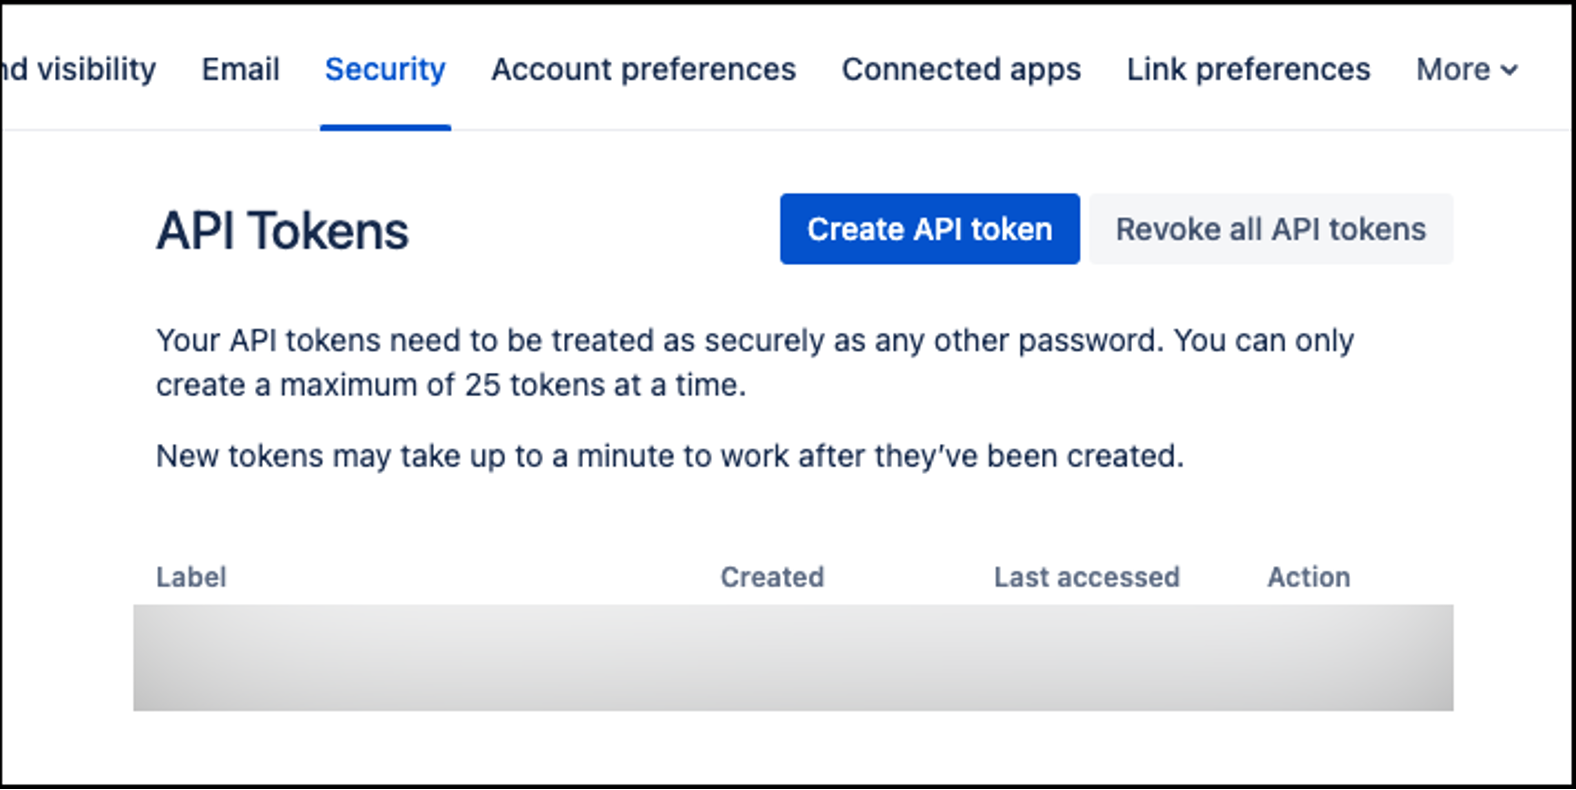
Determine 7: Confluence API token creation
- Within the Create an API token dialog field, for Label, add a reputation in your API token.
- Select Create.
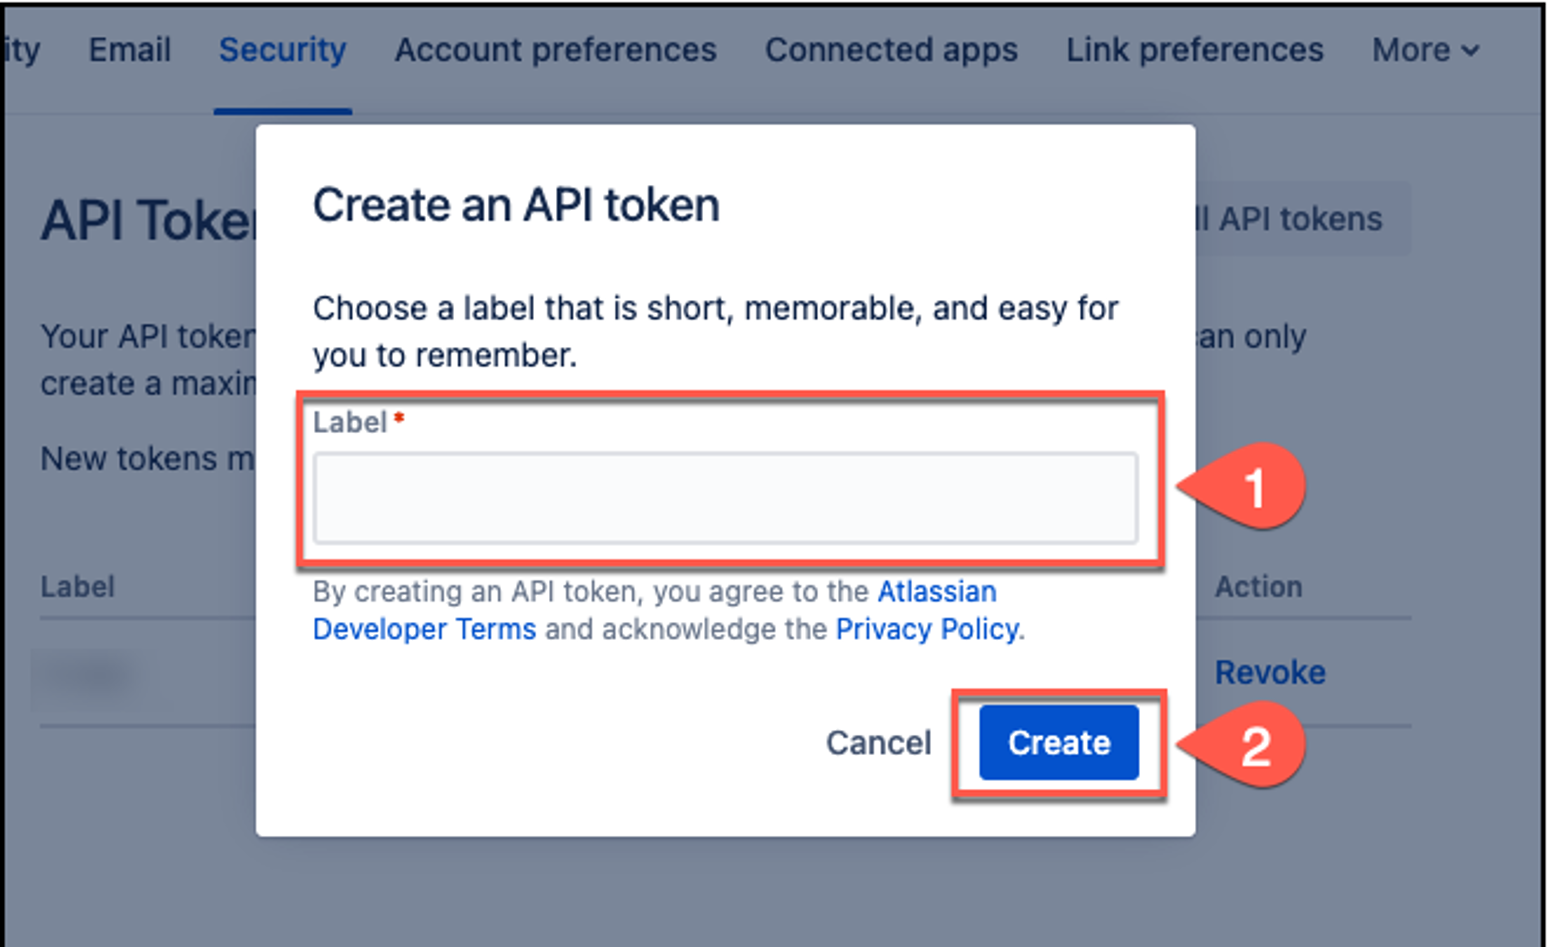
Determine 8: Confluence API token labelling
- From the Your new API token dialog field, copy the API token and put it aside in your most popular textual content editor. You may’t retrieve the API token after you shut the dialog field.
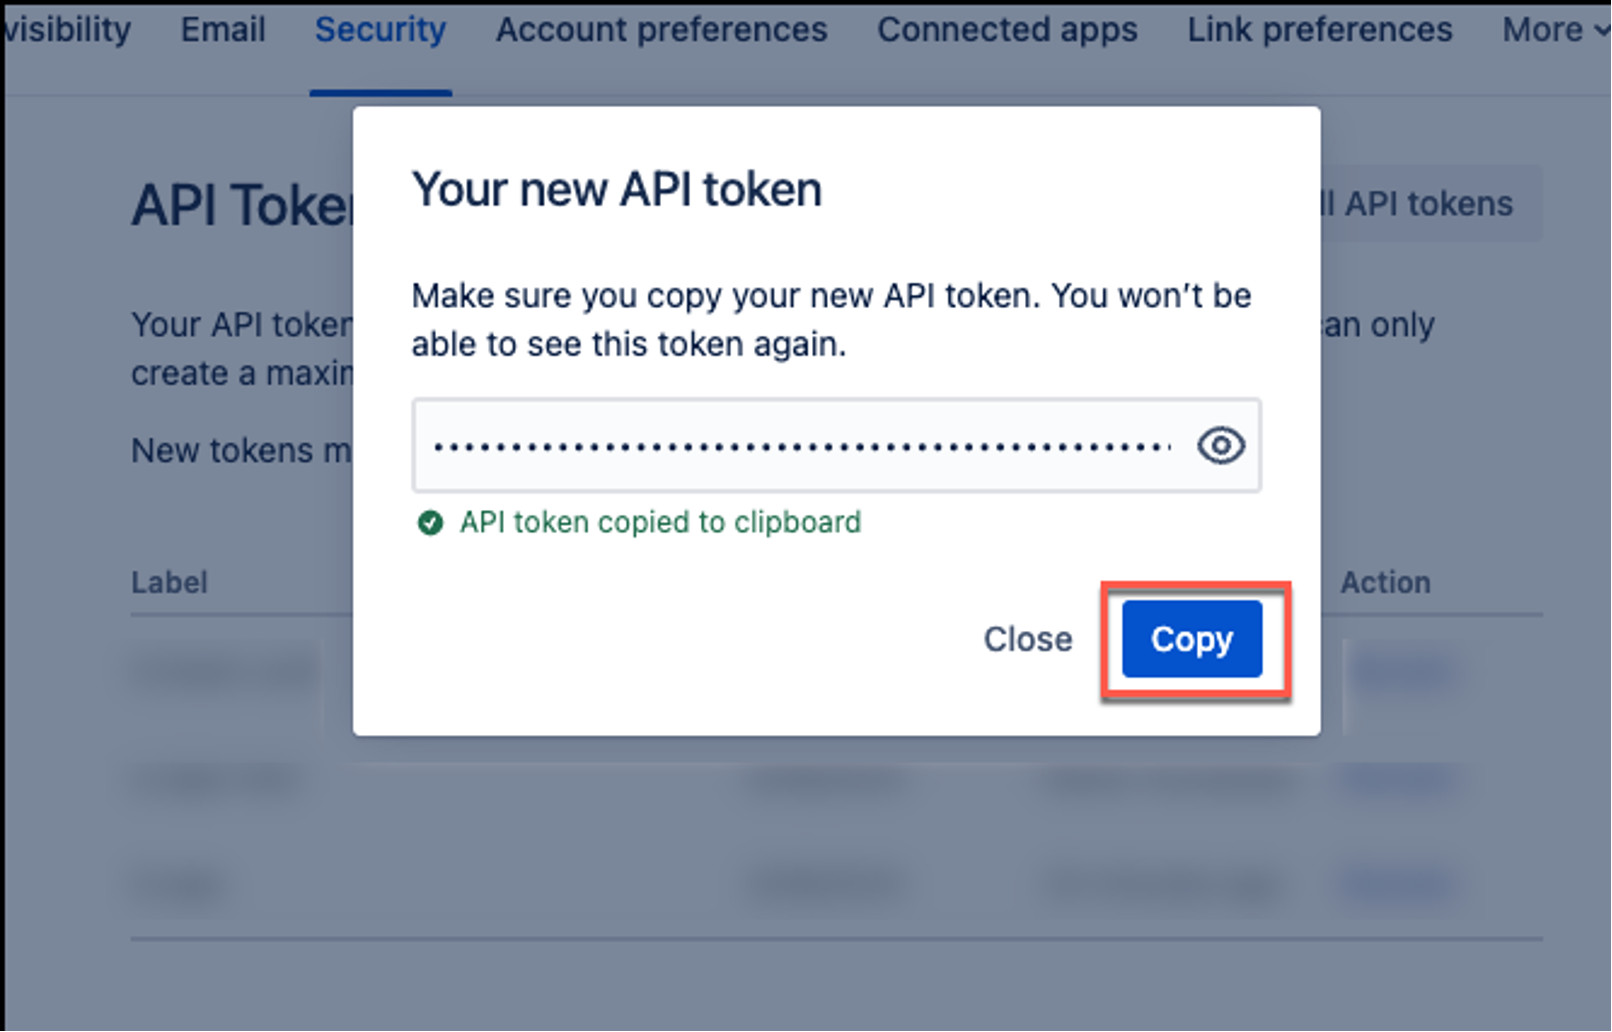
Determine 9: Copying your Confluence API token
- Select Shut.
You now have the username, Confluence (Cloud) URL, and Confluence (Cloud) API token that you must connect with Amazon Q Enterprise with fundamental authentication.
For extra info, see Manage API tokens for your Atlassian account in Atlassian Assist.
Configure Confluence (Cloud) OAuth 2.0 authentication for Amazon Q Enterprise
Full the next steps to configure Confluence (Cloud) OAuth 2.0 authentication:
- Retrieve the username and Confluence (Cloud) URL.
- Configure an OAuth 2.0 app integration.
- Retrieve the Confluence (Cloud) client ID and client secret.
- Generate a Confluence (Cloud) access token.
- Generate a Confluence (Cloud) refresh token.
- Generate a new Confluence (Cloud) access token using a refresh token.
Retrieve the username and Confluence (Cloud) URL
Full the next steps:
- Log in to your account from Confluence (Cloud). Notice the username you logged in with. You will want this later to connect with Amazon Q Enterprise.
- Out of your Confluence (Cloud) house web page, observe your Confluence (Cloud) URL out of your Confluence browser URL. For instance, https://instance.atlassian.internet. You will want this later to each configure your OAuth 2.0 token and connect with Amazon Q Enterprise.
Configuring an OAuth 2.0 app integration
Full the next steps:
- Log in to your account from the Atlassian Developer page.
- Select the profile icon within the top-right nook and on the dropdown menu, select Developer console.

Determine 10: Logging into the Confluence Developer Console
- On the welcome web page, select Create and select OAuth 2.0 integration.

Determine 11: Creating your Confluence OAuth 2.0 token
- Underneath Create a brand new OAuth 2.0 (3LO) integration, for Title, enter a reputation for the OAuth 2.0 software you’re creating. Then, learn the Developer Phrases, and choose I conform to be sure by Atlassian’s developer phrases checkbox, when you do.
- Choose Create.

Determine 12: Creating your Confluence OAuth 2.0 integration
The console will show a abstract web page outlining the main points of the OAuth 2.0 app you created.

Determine 13: Your Confluence software
- Nonetheless within the Confluence console, within the navigation pane, select Authorization.
- Select Add so as to add OAuth 2.0 (3LO) to your app.

Determine 14: Including OAuth 2.0 to your Confluence app
- Underneath OAuth 2.0 authorization code grants (3LO) for apps, for Callback URL, enter the Confluence (Cloud) URL you copied, then select Save adjustments.

Determine 15: Including OAuth 2.0 to your Confluence app (half 2)
- Underneath Authorization URL generator, select Add APIs so as to add APIs to your app. It will redirect you to the Permissions web page.
- On the Permissions web page, for Scopes, navigate to Person Id API. Choose Add, then choose Configure.

Determine 16: Configuring Permissions in your Confluence app
- Underneath Person Id API, select Edit Scopes, then add the next learn scopes:
- learn:me – View energetic person profile.
- learn:account – View person profiles.

Determine 17: Configuring Scopes in your Confluence app
- Select Save and return to the Permissions web page.
- On the Permissions web page, for Scopes, navigate to Confluence API. Choose Add, after which choose Configure.

Determine 18: Configuring Permissions in your Confluence app (half 2)
- Underneath Confluence API, be sure you’re on the Traditional scopes tab.

Determine 19: Configuring Permissions in your Confluence app (half 3)
- Select Edit Scopes and add the next learn scopes:
- learn:confluence-space.abstract – Learn Confluence house abstract.
- learn:confluence-props – Learn Confluence content material properties.
- learn:confluence-content.all – Learn Confluence detailed content material.
- learn:confluence-content.abstract – Learn Confluence content material abstract.
- learn:confluence-content.permission – Learn content material permission in Confluence.
- learn:confluence-user – Learn person.
- learn:confluence-groups – Learn person teams.
- Select Save.
- Navigate to the Granular scopes

Determine 20: Configuring Permissions in your Confluence app (half 4)
- Select Edit Scopes and add the next learn scopes:
- learn:content material:confluence – View detailed contents.
- learn:content-details:confluence – View content material particulars.
- learn:space-details:confluence – View house particulars.
- learn:audit-log:confluence – View audit data.
- learn:web page:confluence – View pages.
- learn:attachment:confluence – View and obtain content material attachments.
- learn:blogpost:confluence – View weblog posts.
- learn:custom-content:confluence – View {custom} content material.
- learn:remark:confluence – View feedback.
- learn:template:confluence – View content material templates.
- learn:label:confluence – View labels.
- learn:watcher:confluence – View content material watchers.
- learn:group:confluence – View teams.
- learn:relation:confluence – View entity relationships.
- learn:person:confluence – View person particulars.
- learn:configuration:confluence – View Confluence settings.
- learn:house:confluence – View house particulars.
- learn:house.permission:confluence – View house permissions.
- learn:house.property:confluence – View house properties.
- learn:person.property:confluence – View person properties.
- learn:house.setting:confluence – View house settings.
- learn:analytics.content material:confluence – View analytics for content material.
- learn:content material.permission:confluence – Examine content material permissions.
- learn:content material.property:confluence – View content material properties.
- learn:content material.restriction:confluence – View content material restrictions.
- learn:content material.metadata:confluence – View content material summaries.
- learn:inlinetask:confluence – View duties.
- learn:activity:confluence – View duties.
- learn:permission:confluence – View content material restrictions and house permissions.
- learn:whiteboard:confluence – View whiteboards.
- learn:app-data:confluence – Learn app knowledge.
For extra info, see Implementing OAuth 2.0 (3LO) and Determining the scopes required for an operation in Atlassian Developer.
Retrieve the Confluence (Cloud) shopper ID and shopper secret
Full the next steps:
- Within the navigation pane, select Settings.
- Within the Authentication particulars part, copy and save the next in your most popular textual content editor:
- Consumer ID – You enter this because the app key on the Amazon Q Enterprise console.
- Secret – You enter this because the app secret on the Amazon Q Enterprise console.

Determine 21: Retrieving Confluence app authentication particulars
You want these to generate your Confluence (Cloud) OAuth 2.0 token and in addition to attach Amazon Q Enterprise to Confluence (Cloud).
For extra info, see Implementing OAuth 2.0 (3LO) and Determining the scopes required for an operation within the Atlassian Developer documentation.
Generate a Confluence (Cloud) entry token
Full the next steps:
- Log in to your Confluence account from the Atlassian Developer page.
- Open the OAuth 2.0 app you wish to generate a refresh token for.
- Within the navigation pane, select Authorization.
- For OAuth 2.0 (3LO), select Configure.
- On the Authorization web page, beneath Authorization URL generator, copy the URL for Granular Confluence API authorization URL and put it aside in your most popular textual content editor.
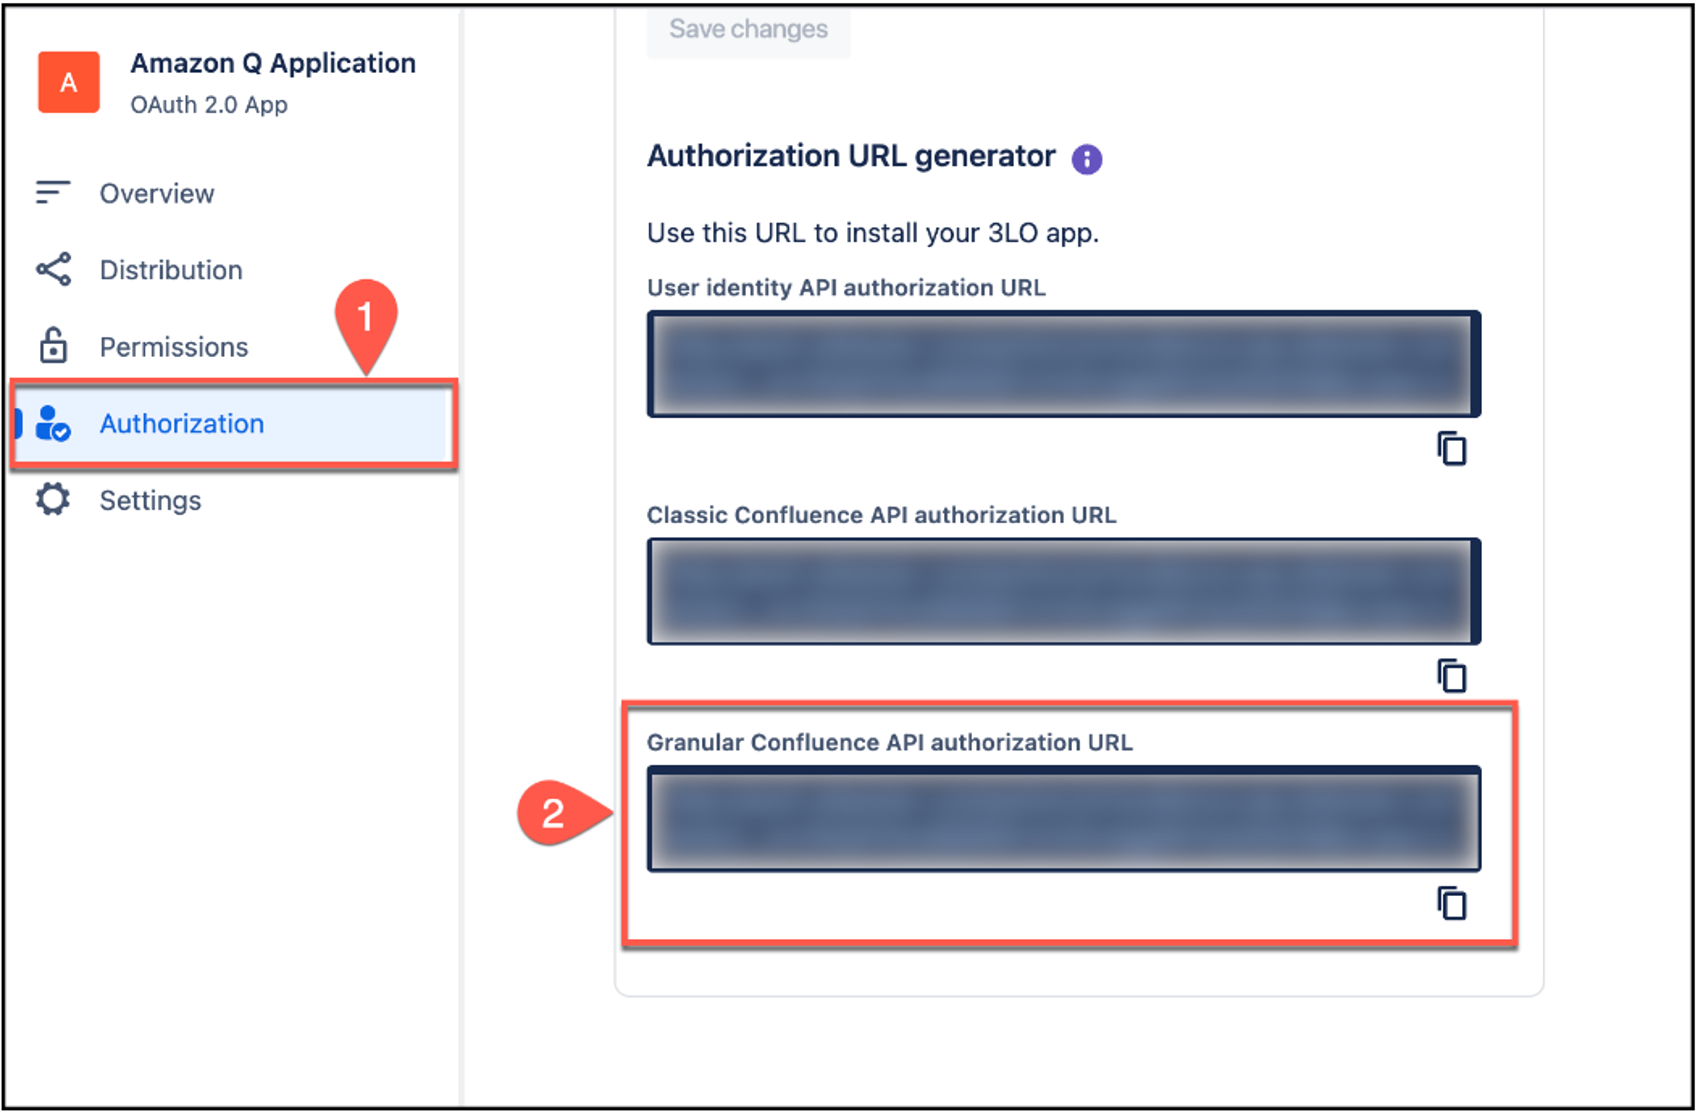
Determine 22: Retrieving Confluence API URL particulars
The URL is within the following format:
- Within the saved authorization URL, replace the state=${YOUR_USER_BOUND_VALUE} parameter worth to any textual content of your selection. For instance, state=sample_text.
For extra info, see What is the state parameter used for? within the Atlassian Assist documentation.
- Open your most popular internet browser and enter the authorization URL you copied into the browser URL.
- On the web page that opens, be certain that every little thing is right and select Settle for.
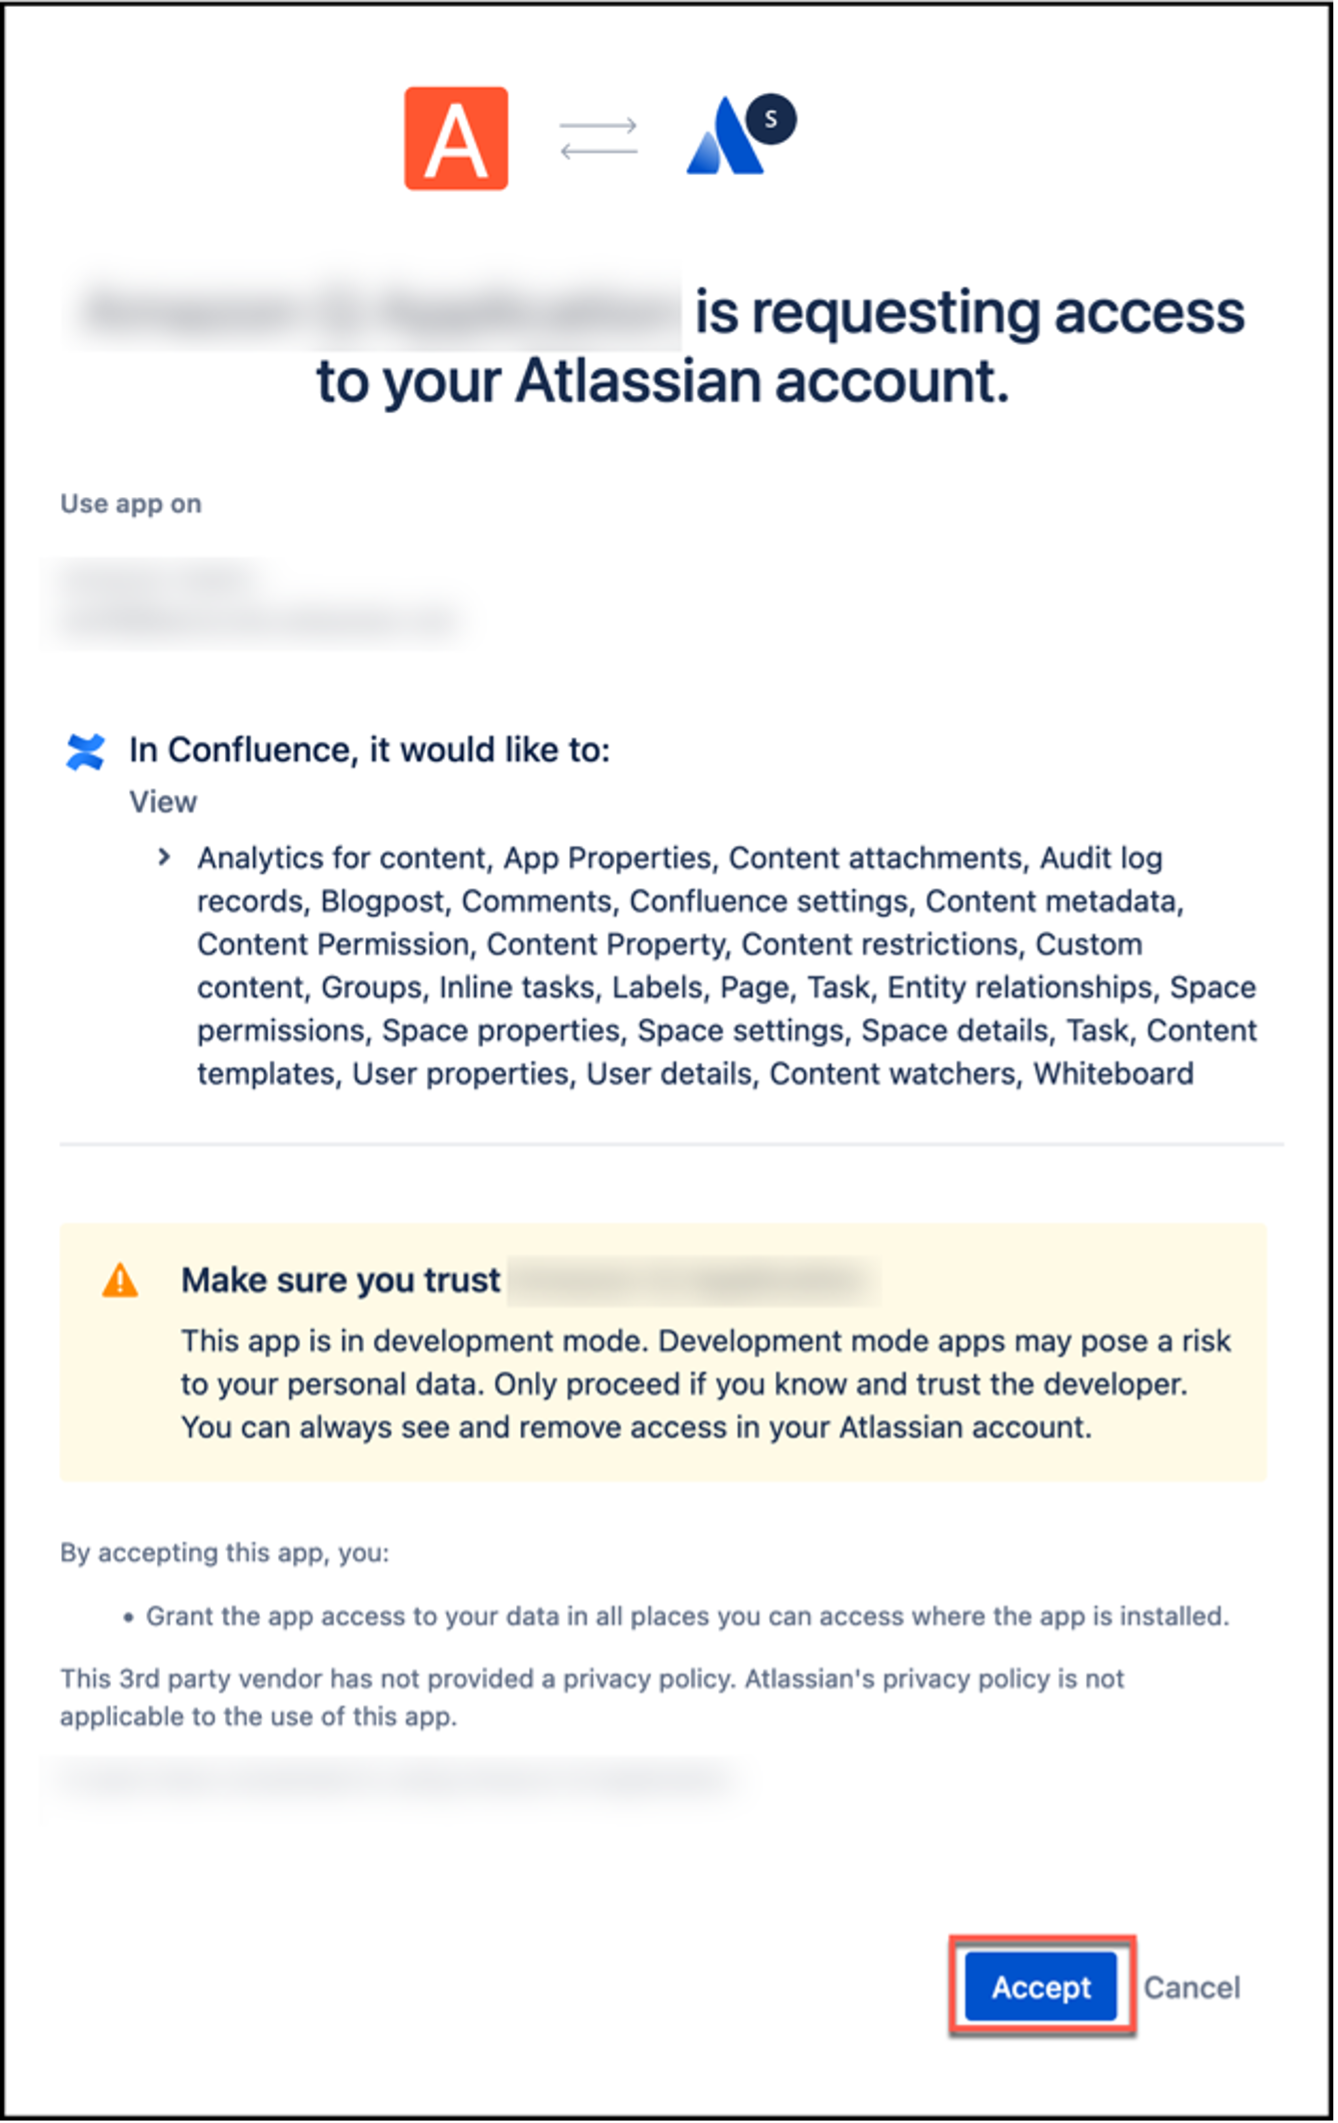
Determine 23: Testing a Confluence API URL
You can be returned to your Confluence (Cloud) house web page.
- Copy the URL of the Confluence (Cloud) house web page and put it aside in your most popular textual content editor.
The URL comprises the authorization code in your software. You will want this code to generate your Confluence (Cloud) entry token. The entire part after code= is the authorization code.
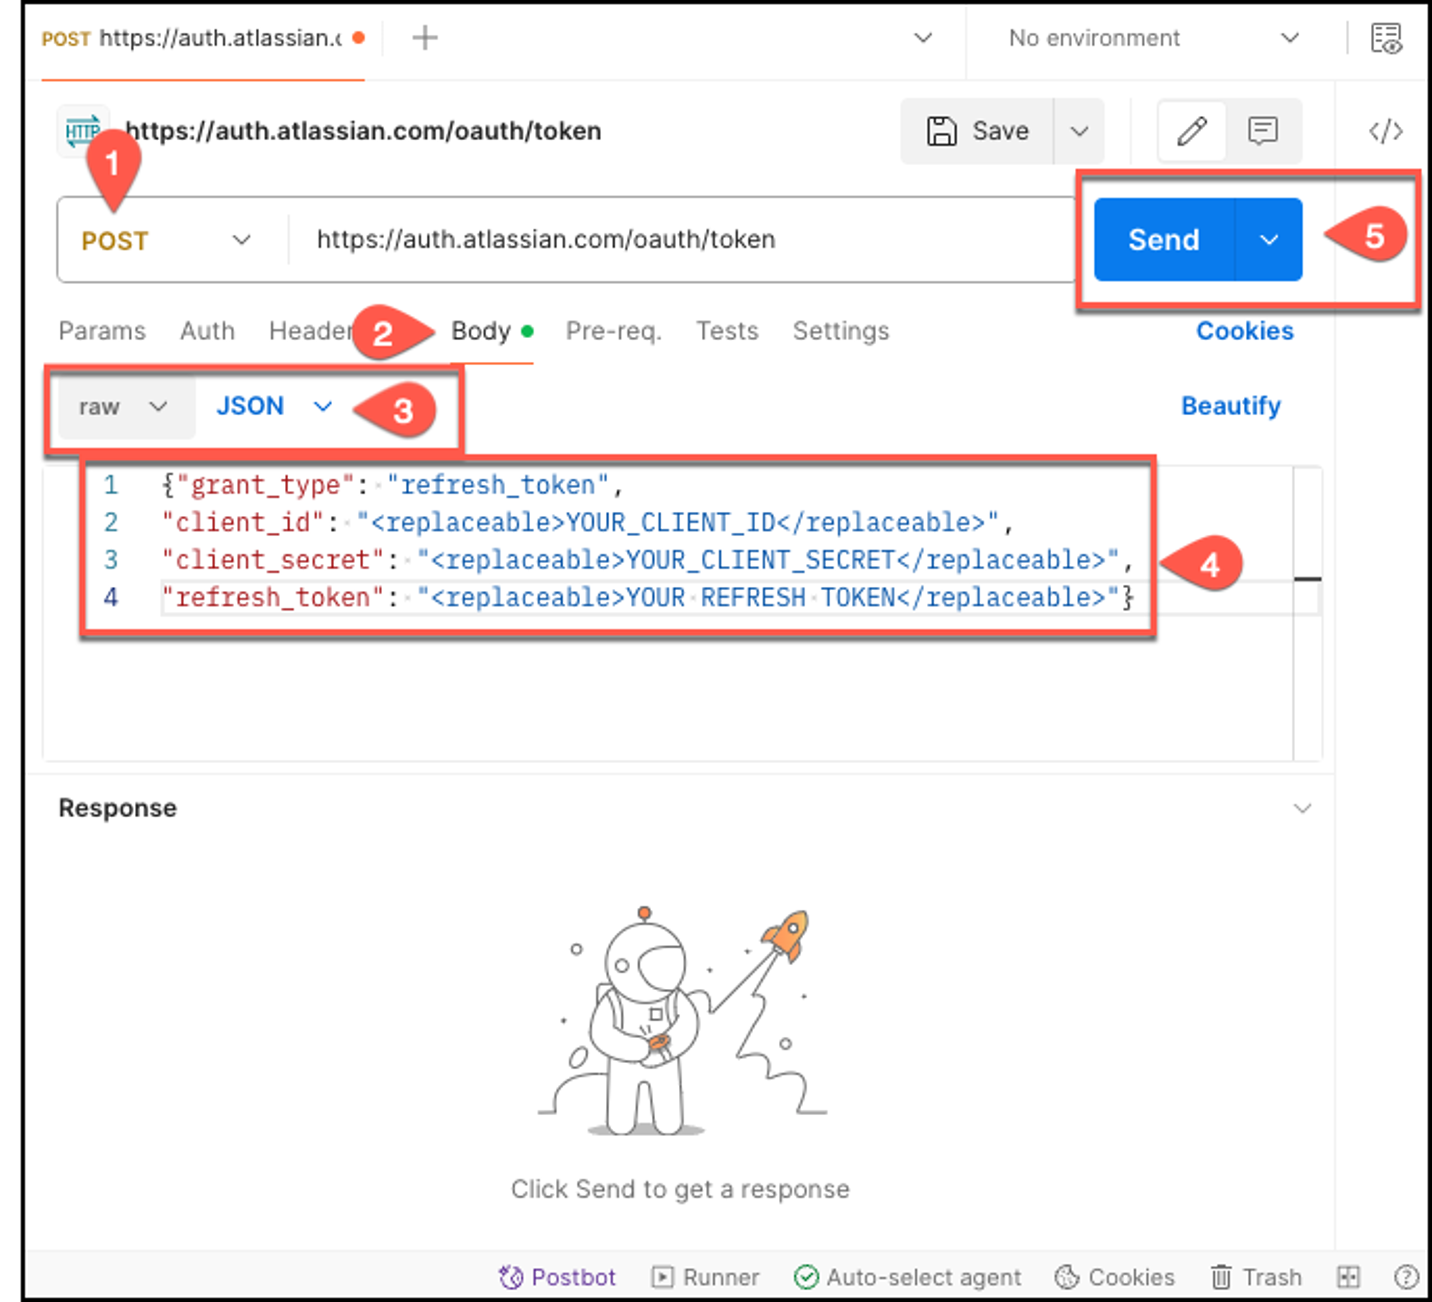
- Navigate to Postman.
In case you don’t have Postman put in in your native system, it’s also possible to select to make use of cURL to generate a Confluence (Cloud) entry token. Use the next cURL command to take action:
- If, nevertheless, you have got Postman put in, on the primary Postman window, select POST as the strategy, then enter the next URL: https://auth.atlassian.com/oauth/token.
- Select Physique, then select uncooked and JSON.

Determine 24: Testing a Confluence entry token in Postman
- Within the textual content field, enter the next code extract, changing the fields together with your credential values:
- Select Ship.
If every little thing is configured appropriately, Postman will return an entry token.
- Copy the entry token and put it aside in your most popular textual content editor. You will want it to attach Confluence (Cloud) to Amazon Q Enterprise.
For extra info, see Implementing OAuth 2.0 (3LO) within the Atlassian Developer documentation.
Generate a Confluence (Cloud) refresh token
The entry token you employ to attach Confluence (Cloud) to Amazon Q Enterprise utilizing OAuth 2.0 authentication expires after 1 hour. When it expires, you may both repeat the entire authorization course of and generate a brand new entry token, or generate a refresh token.
Refresh tokens are carried out utilizing a rotating refresh token mechanism. Every time they’re used, rotating refresh tokens points a brand new limited-life refresh token that’s legitimate for 90 days. Every new rotating refresh token resets the inactivity expiry time and allocates one other 90 days. This mechanism improves on single persistent refresh tokens by lowering the interval by which a refresh token will be compromised and used to acquire a sound entry token. For extra particulars, see OAuth 2.0 (3LO) apps within the Atlassian Developer documentation.
To generate a refresh token, you add a %20offline_access parameter to the top of the scope worth within the authorization URL you used to generate your entry token. Full the next steps to generate a refresh token:
- Log in to your account from the Atlassian Developer page.
- Open the OAuth 2.0 app you wish to generate a refresh token for.
- Within the navigation pane, select Authorization.
- For OAuth 2.0 (3LO), select Configure.
- On the Authorization web page, beneath Authorization URL generator, copy the URL for Granular Confluence API authorization URL and put it aside in your most popular textual content editor.

Determine 25: Retrieving Confluence API URL particulars
- Within the saved authorization URL, replace the state=${YOUR_USER_BOUND_VALUE} parameter worth to any textual content of your selection. For instance, state=sample_text.
For extra info, see What is the state parameter used for? within the Atlassian Assist documentation.
- Add the next textual content on the finish of the scope worth in your authorization URL: %20offline_access and duplicate it. For instance:
- Open your most popular internet browser and enter the modified authorization URL you copied into the browser URL.
- On the web page that opens, be certain that every little thing is right after which select Settle for.

Determine 26: Testing a Confluence API URL
You can be returned to the Confluence (Cloud) console.
- Copy the URL of the Confluence (Cloud) house web page and put it aside in a textual content editor of your selection.
The URL comprises the authorization code in your software. You will want this code to generate your Confluence (Cloud) refresh token. The entire part after code= is the authorization code.
- Navigate to Postman.
In case you don’t have Postman put in in your native system, it’s also possible to select to make use of cURL to generate a Confluence (Cloud) entry token. Use the next cURL command to take action:
- If, nevertheless, you have got Postman put in, on the primary Postman window, select POST as the strategy, then enter the next URL: https://auth.atlassian.com/oauth/token.
- Select Physique on the menu, then select uncooked and JSON.
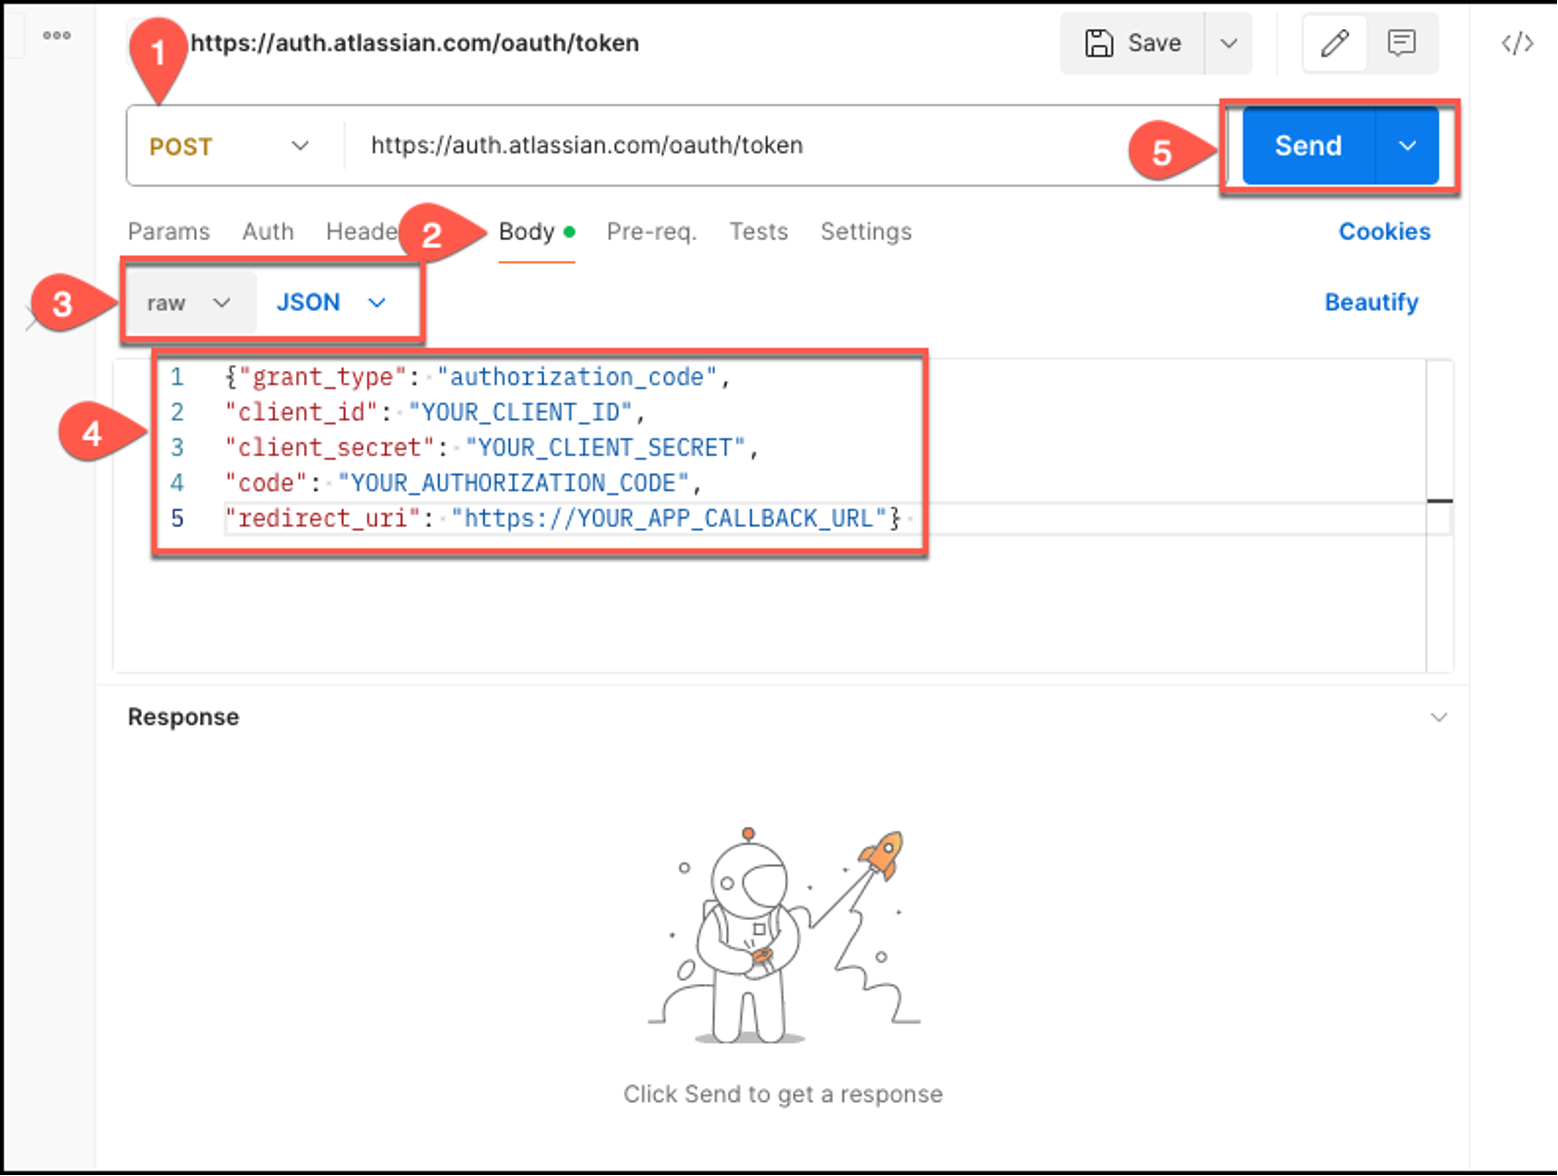
Determine 27: Retrieving a Confluence refresh token in Postman
- Within the textual content field, enter the next code extract, changing the fields together with your credential values:
- Select Ship.
If every little thing is configured appropriately, Postman will return a refresh token.
- Copy the refresh token and put it aside utilizing your most popular textual content editor. You will want it to attach Confluence (Cloud) to Amazon Q Enterprise.
For extra info, see Implementing a Refresh Token Flow within the Atlassian Developer documentation.
Generate a brand new Confluence (Cloud) entry token utilizing a refresh token
You should utilize the refresh token you generated to create a brand new entry token and refresh token pair when an present entry token expires. Full the next steps to generate a refresh token:
- Copy the refresh token you generated following the steps within the earlier part.
- Navigate to Postman.
In case you don’t have Postman put in in your native system, it’s also possible to select to make use of cURL to generate a Confluence (Cloud) entry token. Use the next cURL command to take action:
- Within the Postman foremost window, select POST as the strategy, then enter the next URL: https://auth.atlassian.com/oauth/token.
- Select Physique from the menu and select uncooked and JSON.
Determine 28: Utilizing a Confluence refresh token in Postman
- Within the textual content field, enter the next code extract, changing the fields together with your credential values:
- Select Ship.
If every little thing is configured appropriately, Postman will return a brand new entry token and refresh token pair within the following format:


 Tyler Geary is a Options Architect at Amazon Net Providers (AWS), the place he’s a member of the Enterprise Monetary Providers group, specializing in Insurance coverage clients. He helps his clients establish enterprise challenges and alternatives, tying them again to revolutionary options powered by AWS, with a specific give attention to Generative AI. In his free time, Tyler enjoys climbing, tenting, and spending time within the nice outside.
 Sumeet Tripathi is an Enterprise Assist Lead (TAM) at AWS in North Carolina. He has over 17 years of expertise in know-how throughout numerous roles. He’s captivated with serving to clients to cut back operational challenges and friction. His focus space is AI/ML and Power & Utilities Phase. Outdoors work, He enjoys touring with household, watching cricket and films.
 Vishal Naik is a Sr. Options Architect at Amazon Net Providers (AWS). He’s a builder who enjoys serving to clients accomplish their enterprise wants and remedy complicated challenges with AWS options and finest practices. His core space of focus consists of Generative AI and Machine Studying. In his spare time, Vishal loves making brief movies on time journey and alternate universe themes.